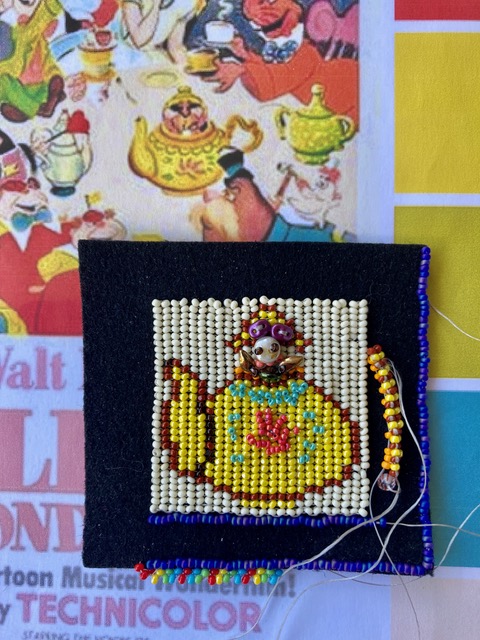
This summer’s Bead Challenge for the Toronto Bead Society had an interesting twist! It was topical, rather than designated color palette. To ease members into the challenge, Christina found a technicolor movie promo for the 1951 Disney “Alice in Wonderland” with five color swatches. These could be used as a color palette challenge if one ignored the Mad Hatter theme.
 |
| Movie Promo and colour palette |
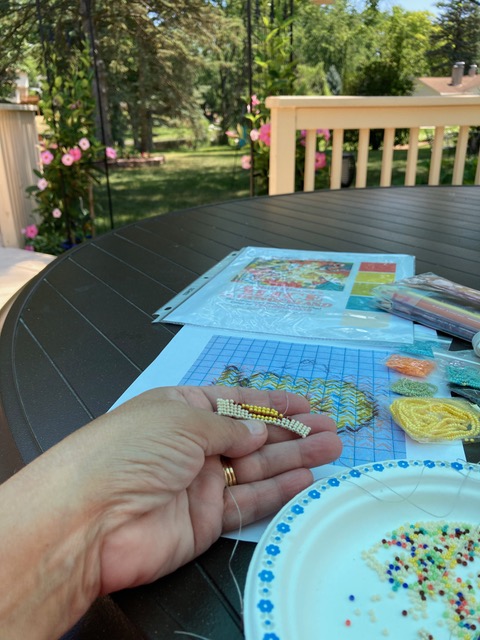
Beautiful surroundings while visiting family in Michigan provided a creative workspace to start bead weaving the teapot! My sister-in-law reminded me there were talking flowers in the movie. I could relate to these! My brother streamed the 1951 Disney “Alice in Wonderland” movie for us. Sister-in-law kept wondering out loud, “What was Lewis on as he was writing Alice?”.
I decided to stick with my teapot theme, add cups and a token flower as a tribute. Curious what the other creative TBS members are going to do for the Aug 10th Reveal?
 |
| Beading in Michigan |
It’s one thing to draw with coloured pencils, and quite another to bead row by row. Size 11/o seed beads are pretty large for shaping a teapot when stitched in herringbone Vs.
I added numbers on my enlarged chart print to easily count rows. Once the base was laid, it seemed easier to just unpick a row or two if the curve did not feel right. To help centre the opened teapot lid, I basted black thread from the base up on the herringbone fabric. The spout was created by color placement as I beaded row by row. A chunky 3-D handle would be added later on the right side.
 |
| Teapot in progress |
 |
| Teapot ready for embellishments |
Using 15/o seed beads, I added an aqua scallop below the teapot opening. Then I gently added 15/o coral seeds for the floral and aqua wisps to mirror the teapot decoration on the poster.
 |
| Testing edge finishes |
Next was a 3-D mouse peaking from inside the teapot! Luckily, a 2-holed lentil bead proved ideal for the face with tiny dark seeds for eyes! An assortment of Czech shaped beads made an interesting mouse body!
The 2-hole lentil bead with red thick petal shapes made a great flower with personality!
 |
| Ready to add handle |
As details were added, the idea for a brooch was emerging. I stitched the herringbone fabric to a black stiff felt backing with a bit of a border for future beading. At first I thought alternating the palette colors on a diagonal would be a clever Mad Hatter theme finish. I tested a colorful three-bead finish sequence.
After visiting the “Spirit Seed” exhibit in the Bruce County Museum, I was inspired to make a beaded frame of teacups around my teapot. Sometimes, less is more! I stitched down a single line of matte navy AB on edge around the herringbone teapot fabric. Then I stitched another line along the outside edge of my stiff felt backing.
 |
| Testing teacup border |
 |
| Layout for teacups |
My teacups are honeycomb-shaped Czech beads I used for sample-making to teach my Netted Honeycomb Collar. Since they have two holes, they were perfect for adding teacup handles. I played around with placement and alternating colors per palette, but again decided red handles were best with crystal AB cups. There are left and right handed cups all around! Even that required planning!
 |
| Planning the placement of the teacup handles |
The teapot handle is a creative strip of 3-D beading weaving. I added 15/o seeds on the inside to retain a curve once the chunky handle was secured to the herringbone teapot and felt. Next, the red flower face was stitched in place and petals reinforced for the permanent playful square.
Naomi Smith’s vintage brooch closure is incorporated on the back. A few stitches across the strip keeps the pin from riding too high. It is position underneath the mouse hiding under the lid so the brooch is balanced when worn.
 |
| Leatherette back and beaded front of brooch |
In the end I decided to emphasize the teacup frame. I cut away the test 3-bead diagonal finish because it reminded me of a circus. I like how Jane Chong trimmed her "Hearts for Ukraine" brooches with Crystal AB beads. I tested 8/o and 10/o and found the smaller beads best for trimming my brooch. I carefully stitched a single bead edging under the matte navy AB row of beads to join the leatherette backing to the beaded front.
 |
| Beading to join back and front |
 |
| Vintage brooch closure in place |
With this challenge I tried new techniques and creatively solved issues as they came along. I highly recommend new quests for growth and fun!
 |
| Finished brooch |
Cheers! Test-wearing my Teapot Party Brooch in Niagara on the Lake.
 |
| Enjoying an Aperol Spritzer |
 |
| Enjoying the flowers |


You have created a very original piece. I have greatly enjoyed how you have documented and described how your creative process works and the challenges you have faced. Much love to you,
ReplyDeleteAna Cravidao (aka acbeads), Portugal
http://acbeads.blogspot.com/