pinterest pin it

Showing posts with label creativity. Show all posts

Friday, May 7, 2021

Still Life Dichroic Brooch

Thanks to my Tuesday afternoon Beading Circle for challenging me to create something fresh. Our Zoom meetings are a great opportunity for beady friends to compare notes, share bead trivia, discuss beading technique, spotlight new designers and patterns. Everyone is beading at home with their stashes nearby. Its fun to do bead along projects.

When the idea of doing a beaded brooch in April arose, folks assumed this would be a bead embroidery challenge. Someone suggested to peruse one’s stash for a button or cabochon as the starting point for a brooch focal. I did not have any buttons.

I’d like to share my creative process of my Still Life Dichroic Brooch.

DICHROIC FRAME ART

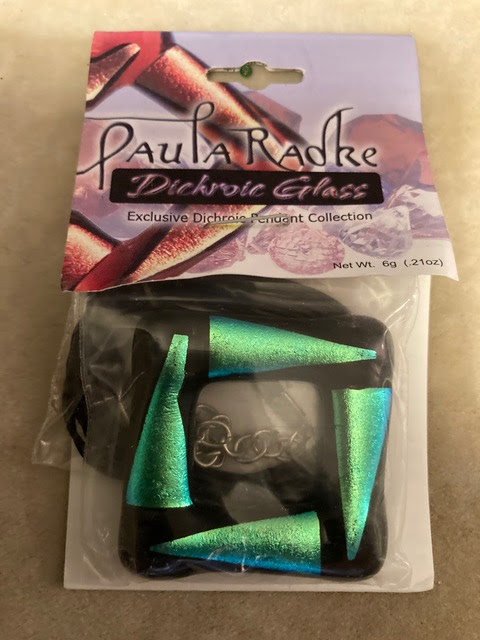
I did have a dichroic lampwork square frame pendant kit by Paula Radke from way back when I was participating in international bead shows in the late 2000s - early 2010s. I never strung the frame to wear, so it was perfect for my brooch!!


I envisioned the dichroic square as a frame for a miniature artwork. Google is full of images of paintings for inspiration! Rainbow Ridge - Colorful Landscape by Julie Brugh Riffey spoke to me. 


I poured a little of every intensely-colored charlotte 11o beads onto a Chinet® plate for painting with beads with the Ndebele technique.


I managed to recreate the feel of Rainbow Ridge one bead at the time. My beaded interpretation is dancing in the frame because of the shadows created by beads sitting at herringbone angles and the charlotte-cut of the beads which reflects light.


STILL LIFE 

Next, I used the leftover unique black-copper bead from the TBS 2021 Bag of Bead Challenge for a vase. Using the daisy stitch I filled the vase with beaded red and scarlet flowers.


To make sense, I decided to create a still life composition with my two main elements. Again, I looked through artwork on the internet for ideas. How do I show surfaces, light and shadows using beads? The artwork needs to be hung on the wall. The vase of flowers needs to be placed on a table.


TILA WALL

While scrounging around my stash I found a few surprises. I forgot I bought four tubes of Miyuki Tila Bead. Also, I purchased an assortment of microscopic seed beads from Bead Cats  in sizes 16o to 24o. I knew I had bugle beads in different sizes for creating the tabletop. 

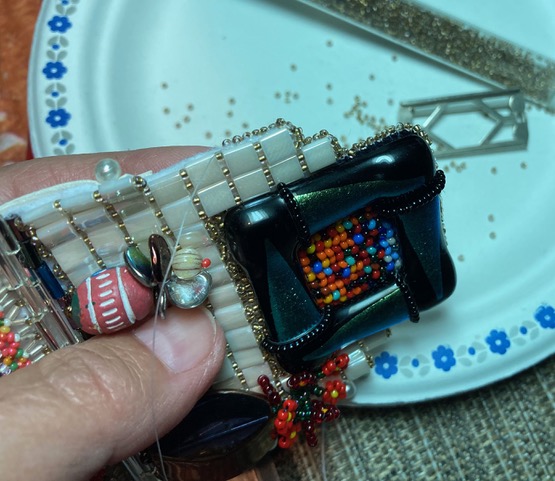
The flat tile-shaped 2-hole Tila beads were ideal for creating a wall. I played around with square-stitching one tile to another and stringing a wonderful bronze-lined 15o seed bead between stacks of tiles. 


The wall grew tall and wide around the frame. The stepped down tile wall reminds me of Art Deco.


I had to work out how to assemble my beadwoven art in the frame, how to stitch my wall down. To create the brooch I needed some foundation to stitch and secure it to. I ordered a stiff felt beading foundation and a faux leather for a backing for my brooch from i-Bead

NETTED FLORAL TRIM 

I wanted my still life tablecloth to have a floral design. This is where the microscopic seed beads can in handy. The top of the netted tablecloth has microfine vintage bugles meeting up at the bronze-lined seed bead.

I found these would be a safe bet to connect the netted trim to the foundation. I sketched out a netted design in colored pencils. Clever color placement made it look like flowers with leaves. 

Each row of this vertical net is finished in a picot trim. The floral pattern was made to the width of the Tila wall.


Now was the time to stitch down the wall to the foundation. I cut out a rectangle of stiff felt, placed the netted tablecloth and calculated how high should the wall be placed.

How much space to I need for my bugle tabletop between the two?

BUGLE TABLE

I marked where to stitch the seed bead for the top of my netted tablecloth. This way everything was perfectly spaced. 

The wall was stitched down along the seed beads between Tilas. I then laid out the different colors of bugles trying to capture the light and depth of a table top.

TIP: To keep the color sequence intact for reference, take clear tape and press down on the bugle layout. The sticky tape will pick up the bugle rows as a single unit. Place it up higher for reference to see which bugle to pick and stitch them permanently in place. 

HANGING THE PICTURE FRAME

Then, it was time to hang up the picture. Luckily, there was a space on the wall for the frame. First, I traced the inside of the frame to know the positioning of the herringbone-stitched picture. I stitched my artwork to the foundations by stitching randomly between the beads.


To secure the frame to the foundation, I used a single continuous line of Aileen’s glue. Then I pressed down the dichroic frame in position on top the glue. 

Once the glue dried, I stitched down the corners of the frame carefully not to break up the dichroic triangles design. I used single strings of fine black beads to stitch down each corner.  Then I reinforced them with extra stitches close to the bead strings. This way the glass frame is securely part of the foundation, an important consideration since I will need to add a brooch pin to wear!


Time to add the vase on the tabletop. The tail below the stop bead at the bottom of the copper vase was handy for securing through the tabletop bugle row. I then had to go up through the vase to secure the odd-shaped copper bead. The remaining thread from the daisy flowers was used to stitch down the flowers in a few places. 


To balance the composition, I created another vase using an incised Indian bead as the vase. Petal beads in my stash came in handy to create an exotic bloom. By stringing a 15o between each petal I was able to create a flower. It is topped with a melon bead with a coral turnaround bead for zing. This vase was positioned on the tabletop and stitched down to the background.

BROOCH PIN

Thanks to Naomi Smith of Black Tulip for sharing her technique of attaching vintage pins to brooches. I borrowed the pin from my Bead Poppy I beaded in her workshop. 


TIP: For a discreet brooch clasp, I centered and stitched across the 1” strip 1/4” down from the top of the faux leather backing. This was to prevent the vintage brooch pin from riding up too high.

BACKING

The brooch needed a backing for a tidy finish. I used faux leather which was really nice to work with. I cut it out in the same shape as the foundation. Also, I cut out a 1” wide x 3-1/4” brooch pin holder strip.

Time to start stitching the backing onto the foundation. For every stitch I added the 15o seed bead. This created a fine smooth discreet bead edge. The 1” strip was stitched together the backing. When I started stitching up near the black frame, I quickly recalled a tip to darken the edge.


TIP: Use a Permanent Sharpie marker to tone down the white foundation edge.


The bead edge-stitching continued down to the bottom and along the lower edge underneath the netted floral. The lower edge of the brooch pin strip was trimmed even to the lower edge and stitched together with the backing. The bead edge continued up to meet the start.

I slipped in the brooch pin under the strip ready to wear. I’m pleased my brooch is balanced and comfortable to wear.


Tuesday, December 17, 2013

ABC's of Creativity - Y is Yarn

Yarn is defined as a long continuous length of interlocked fibres, suitable to use in the production of textiles, sewing, crocheting, knitting, weaving. Since I’m approaching this from the beading angle, I’d like to present a few examples of how yarn is used as the carrier of beads and show a few examples of how the combination works. 
"Bobbles by the Yard" by Flo FLory
Project in A Needle Pulling Thread, Summer 2011

I’ve been told the beads have to be put onto the yarn before beginning to knit or crochet. This is something that needs to be prepared in advance. You can use and finer thread and needle to hook your yarn into a folded knotted thread OR use a split needle to catch the yarn and string seed beads for your project.
"Threading beads", Knitting with Beads,
www.vogueknitting.com
VOGUE Knitting has an excellent intro to Knitting With Beads. There are two ways: random or planned placement called “beaded knitting” where the beads fall over the stitches rather than between them. There's the stockinette and the slip stitch method for single beads embellishment of knitting.
"From the wrong side", Kntting with Beads,
www.vogueknitting.com
'From the right side", Knitting with Beads,
www.vogueknitting.com
The other was is ”bead knitting” where the beads are placed between each stitch for a solid beaded look. I haven't found a video tutorial on bead knitting. Guess you'll need to take a class with Flo and learn from a master.

Knitting with beads was developed in the 18th and 19th centuries and used for purses of other elaborately decorated items. It’s called “bead knitting” or “purse knitting”. It is created by placing on bead between each stitch, so that the knitting stitches are completely hidden by beads. Intricate patterns can be created in bead knitting by threading beads in reverse of the design which  must be completely accurate.

"Hearts", knitted reticule by Flo Flory, ON
I have had an opportunity to get a closer look and feel at Bead Knitting through fellow Toronto Bead Society member, Flo Flory’s work. Flo designs and teaches bead knitting and was kind enough to come over with her beadwork when I was preparing an inspirational visual presentation, “Beadwork: The Most Versatile Art Form” in Oct. 2011. Better yet, it was great when we were able to pass around her finished knitting work during my presentation. Folks got to feel how soft and fluid the purses and accessories were. The larger the piece, the heavier it gets because uses glass Czech see beads for knitting. Haven't found a video tutorial on bead knitting. Guess you'll need to take a class with Flo and learn from a master.

"Looped Evening Bag" bead knitted bag with bead trim, 2011
by Flo Flory, ON 
"Sea Breeze  Bag & Bracelet, bead knitted bag and bracelet
by Flo Flory, ON
Project in A Needle Pulling Thread, Summer 2007
'Houndstooth" bead knitted zipper case, 2008
by Flo Flory, ON
"Magic Tube Necklace", bead knitted
by Flo Flory, ON
Beaded Tie, bead knitted by Flo Flory, ON
(l.-r.) "Teddy Bead,, 2005, TIe and Beaded Star, 2010r,
all bead knittedby Flo FLory, ON

There are a lot of video tutorials on adding a few beads here and there. See Theresa Grisnati’s tutorial of how to add a single bead into your knitting by using a crochet hook as a tool to add beads as you are about to for the knit stitch.

Theresa Grisnati, knit hat with bead embellishment. See youtube video

Bead can we used as trim in a knitted piece. There are many different technique for effects, but single space aout beads are the simplest embellishment. 

Beads and yarn also go together in crochet. My sister-in-law Lynn Wasylkevych crochets with beads on yarns for a soft hand and on wire for a harder edge where the beads appear to float, but that’s a different story.

"Winter on the Blue Ridge", by Lynn Wasylkevych, NC,
for a competition at a Bead Society, 2009

Detail of "WInter on the Blue Ridge". Crocheted base with wire crochet trim.
"Green Apples", bead crochet bracelet
by Lynn Wasylkevych, NC, 2009
Hope this blog gives you an appreciation of how well beads and yarn go together. It's yet another great way to show a little creativity.

Happy beading,
Maria


Wednesday, February 13, 2013

ABC's of Creativity - C is Color

Visual presentation by Maria Rypan, 2012;
"Beader's Palette" by Jan Huling


"Beader's Paint Box" presentation for Creativ Festival Spring 2013
INDO Bracelet, Lariat & Earrings, Rypan Designs 

How do you get your beadwork to pop? Maria's presentations share a little bit of colour theory with lots of examples to show how to place bead colours, finishes and metallics against each other. The visuals make it possible to examine many variation and then apply what was learned in your beading. 

Color is a phenomenon of light or a visual perception that enable one to differentiate otherwise identical objects. It is described in terms of hue, lightness and saturation for objects; hue, brightness and saturation for light sources. Hue can be contrasted with black or white. (Miriam-Webster Dictionairy)

The relationships are best understood with color wheeels, a concept invented by Sir Isaac Newton in 1666.  These wheels from Color Matters show the basic concept.

Primary Colors. You can't stir beads to create the secondary or tertiary colors. But you can choose to place them according to the color wheel. These beads all have the same saturation. Black is not a hue. 
INDO Lariats have novel Indonesian lampwork beads, Rypan Designs 
Complementary. These beaded boxes use the very same hues, but vary in their color placement within the same design.
"Anemone Box Series" beaded by Jo-Ann Woolverton; inspired by Julia Pretl
Complementary. Using a bit of the opposite color on the wheel gives your beadwork zing.
"Wisteria" Textured Net, Rypan Designs

Analogous. Use colors next to each other on the wheel. These warm colors seem to advance.
"Coca Cola Bottle Caps" necklace and bracelet by Maria for friend Dolores
Monochromatic. Try tints and shades of the one color to make it interesting. These cool colors seem to recede.
Dangle Earrings using Swarovski ELEMENTS®, Rypan Designs 
This TBS Bag of Bead Challenge was full of opaque, transparent and  silver-lined TEAL seed beads. It also included the pressed glass, buttons and sequins.
Two pairs of complimentary beads were strategically placed to create the netted pattern. Note the playful color effects and turnaround beads in the strung fringe.

"Sedona Kilim",  Maria Rypan, 2000
Rainbow® Color Selector is a 5" wide tool which also comes in a Tonal Color version.
It's available from Fire Mountain Gems.
This ultimate color wheel was designed as a fundraiser by Ewelina Rzad. 50 beaders from Poland participated. Soutache and seed bead wrapped cabochons are tastefully layered into a collar. Each cabochon is a mini work of art. Light tinted red and purple hues create the 'V' which turns to cool colors on the right and morphs into warm colors on the left. 
"Tęczak - The Rainbow". CLICK to see how cabs were wrapped in soutache by the bead artists
Margie Deeb's bible for beaders
This is the only book of its kind written specifically for bead artists, The Beader's Guide to Color teaches beaders of all levels everything they need to know about color to create unique and vibrant beadwork designs. Author and artist Margie Deeb discusses in depth the psychological and symbolic associations of all the colors of the spectrum, and the ways in which color can be used to create and accentuate pattern, rhythm, and movement. Twenty-one color schemes are described and illustrated in detail with accompanying projects. 
Playing with color is fun!