pinterest pin it

Showing posts with label Toronto Bead Society. Show all posts

Sunday, February 9, 2025

Honeycomb - Toronto Bead Society 2025 Bag of Beads Challenge

This year’s Bag of Beads looked beautiful in the bag — warm honey with a touch of turquoise blue. It even came with real amber chips! And some sort of button earring stumpers with smashed down posts, clips, and a load of tiny headpins.

Contents of the Bag of Beads

The Toronto Bead Society (TBS) Bag of Beads challenge is to use at least one from each of the bags in the kit we were given. We could add any other needed supplies from our own stash.

What to do?? No muses for the longest time. The recurring theme that kept coming was “honeycomb”.

Inspiration

The next challenge was how do I create a honeycomb that would hold its hexagonal cell? The logical answer was bead embroidery. But the next decision was, “Will it be another work of art in a shadow box like the last three challenges (Nautilus, Mid-Century Modern Living, Secret Garden)?”, OR “Can I make this challenge be wearable?

 “JUST DO IT!” 

I cut a piece of blue Stiff Felt left over from a previous challenge. Then I tried a few different ways to stitch a honeycomb cell. The most effective way was to draw a 1cm. cell with a pencil, then stitch a light-coloured rough-cut satin beads individually, but then add another on each line. By stitching a metallic gold 13/o seed bead in the corner, a cell shape was created. 


Since I was creating on the fly, I kept drawing a few more hexagonal cells on the blue foundation, then stitching down satin beads with seed beads defining the corners. With time, five rows of cells felt right for the height of a medallion and five and a half cells were best for the width.


Next, the cells needed to be filled in with honey. I tried stitching down the opaque and metallic sienna seed beads in a cell, but it was very sad. Then I strung segments of 1 op. sienna seed, 1 met. sienna seed, 1- 4mm round amber pressed-bead, followed by 1 met. and 1 op. sienna. 

Each segment was secured in between satin beads on one side and pulled across the cell, then secured on other side between satin beads. 


Once five segment strings were secured across all cells, I framed them with a string of alternating single turquoise opaque 8/o seed beads and #2 Czech s/l bugles. The turquoise frame needed to be couched down. So, I trimmed the Stiff Felt foundation fairly close to the honeycomb.


Then stitched down the bugle frame between beads.


STRINGS AND STUMPERS

Next I had to deal with the stumpers. I stitched on the clips to the underside of the metallic button earrings


Then glued them down with E6000.


Since this was going to be a wearable piece, I strung a fine beading wire with alternating turquoise 8/o beads and amber 4mm round beads. Luckily, there were just enough round beads in the Bag! 


To secure the string to the buttons, I added a crimp, wiggled the wire through the underside openings of metallic button, wove the tail back through the crimp and pressed it firmly to stop the strung bead wire from slipping.

ADDING THE BACKING 

Once the string assembly was complete, I stitched down the clips to the back of the bead foundation. The metallic button was left exposed because it was a design element transitioning from the Honeycomb medallion to the fancy bead string.


Luckily, I had a piece of faux leatherette in my stash. I trimmed it to the medallion's size and basted it through all the layers so I could bead a clean finish. A traditional 3-bead finish would not work because of the turquoise bugle/seed frame! Don’t know if anyone ever did this before, but I figured out a way to catch the top and bottom through a sienna seed bead for a systematic stitch. Practical and neat. 


This is my creative solution dealing with the situation at hand. In the end, it looks like a bead sandwich layer between the Honeycomb and leatherette backing!

FRINGE FINISH

In another little bag were two novel beads which needed attention. Since the rule is, “use at least one from each bag”, I chose the round “world” bead instead of the chunky sienna tube bead.

To deal with this heavy bead, I tried suspending it from 8/ turquoise beads in the centre-front of my Honeycomb medallion. I figured surrounding fringes would soften the look.

I like playing with color and shapes in fringes. There were chiseled flat coppery beads (which I donated to the cause) in another bag. As well as a bag and short string of real amber chip beads. I felt there needed to be some zing between these interesting beads. In my stash I had a few turquoise chip slivers which worked really well in between the chiseled bead and amber. Of course, a turquoise seed bead at the bottom would not only holds beads on each fringe from falling, but add the ultimate zing.

The fringe is very organic. Each one varies in length and look because of natural material differences. This was not about perfection, but feel. 

The short headpin was a headache. I managed to thread a few beads on a headpin and attached it to the clip. See the highlighted pin on the photo. Challenge met, but not seen!

This Challenge was fun in the end because I let the beads and materials direct the creative process once I had the honeycomb theme and wanted it to be wearable. 


Sunday, January 21, 2024

Nautilus - Toronto Bead Society 2024 Challenge

This year’s Bag of Beads Challenge had a lovely cohesive neutral theme spread across 16 ziploc bags. It was an elegant one, with unusual pearl cabochons (stumpers), large pearls set in copper bases (it is a finding, or a part of some fastener?), and fancy rhinestone cup chain on shaggy trim (stumper) plus thirteen (13) more bags of beads in all shapes and sizes.


Since I prefer beadweaving, I first tried bezelling around a pearl cabochon. Not easy when you’re working in thin air and don’t have micro beads to shape a bezel to hold a flat-backed pearl. Plus how do you finish the back which no one will probably see? 

Forget about my “Snowman Family” idea!


Next, I had an idea for an ammonite which would unfurl from the center to wider chambers which I could fill in with beads. Once I started the Google Image search for ammonites, I discovered nautilus fossils. Ammonites are usually shown cut in half to reveal the incredible inside while nautilus are 3-dimensional living fossils.

Fleshing out the idea — materials

I settled on Madagascar Direct’s Nautilus Fossils photo because of its graphic simplicity and coloration. I could visualize bead embroidering a nautilus using the beads in the TBS 2024 Bag. The website definition: “Nautilus fossils are the fossilized remains of ancient molluscs, a part of the cephalopod family along with octopuses, squid, and extinct ammonites.”

I printed out the nautilus photo in a few sizes to test out my idea of using the large pearl-set-in-copper in the center of the coiling and add five pearl cabochons to start the fossil spiral whorls. 

Now I had a ‘Master Nautilus’ photo to refer to while bead embroidering. I had artistic license for this Challenge, but needed reference for the shape and shading to be realistic.

I have always admired mosaics where the artist would incorporate unusual shapes and colors into their art and work around them. To me glass beads are like colored pieces of inlaid stone and glass. In 2010 I took a “Goddess Freeform Bead Embroidery Pendant” workshop with bead artist and teacher extraordinaire, Sherry Serafini. Learning creative beading around objects, creating textures by securing beads in different ways was a liberating experience which stayed with me forever!

Since this was going to be a 3-D bead embroidery full of texture, I needed a stiff ground to embroider on. It needed to be a blue color to showcase the iridescent nautilus. I bought a Good Felt Bead Foundation, which was described to be “a semi-stiff foundation on which beads are sewn to create bead embroidery designs. A needle glides through it, but it is stiff enough to support your projects without hoops or card backings.” (I was disappointed in the end when the weight of my nautilus caused some ‘cracks’/folds in the foundation.) 

I purchased my third 9x9 shadow box frame in a blond woodfinish from Michaels. It’s the perfect frame for 3-dimensional art because of the depth and canvas board for pinning.

At home I pulled out my 2024 Bag of Beads along with the leftovers from the TBS 2009 Challenge. The contents were in the same ivory tones, but had a few more interesting spares, i.e. butterscotch-colored rounds and facetted glass beads with a caramel-colored core. They came in handy for stitching onto the rest of the whorls of my nautilus.

I needed to test the placement of my nautilus in the frame, as well as figure out what I was going to do with the rhinestone cup chain trim.


Drawing a nautilus on the blue felt

Old school methods never die!! The best way to get the main lines onto the blue felt was to make a photo copy of my master. Next, cut along the main septa (color bands) to make thin channels for a pencil to draw lines on the felt.

TIP: When cutting lines with an Exacto knife or OLFA Multi-purpose cutter, use a self-healing mat. Press down the paper firmly as you cut slits along the lines. Rotate the paper to allow for smooth curved lines. STOP short so you have a stencil-like sheet without tears which you can position on top of the foundation. Cut a second line 1/8” (2mm) away from the first cut. Score both ends of each section and remove the paper line to reveal the slit.


I positioned the cut-out stencil on the blue felt foundation. I left the extra space above and below the nautilus for final tweaking in the end after my bead embroidery was done.

Using an old-fashioned wooden pencil, I carefully traced the lines between the slits. I was able to press firmly and had full control of the drawing the line. Mechanical pencil leads would break if pressed down too hard while drawing.

Next, I sized up the ‘master inspiration’ and frame. I connected the pencil lines on the felt for a smooth drawing. Then I reviewed the project and figured out a plan of attack.


Start of bead embroidery

I positioned the center pearl and pearl cabochon in position on the blue felt. For the record, this is where artistic license kicks in. The pencil lines on the felt were for reference only! It was up to me to try to reimagine a nautilus using the beads and stumpers in the bag. So here’s my bead embroidery story.

Thanks to a friend, I was told E6000 glue holds cabs to felt securely, so there is no need to decrease the bezelling as in my first test sample.

The outline of each pearl cabochon is purely decorative because the glue seal is strong after sitting to dry for 24 hours. I bead embroidered a bezel using the cylindrical lustre-coated ivory beads around each pearl cabochon so closely, I could not add a second or third peyote row even if I wanted! I was satisfied with the clean single bezel outline. 

Next, I used 8/o Hex beads from my stash to ‘draw’ the septa (dividing walls between chambers). I was ‘painting’ with bead colors following my Master photo reference. So, I played with matte grey, taupe and light gold Hex beads. It was interesting to note the names color assigned to the Hex beads by Miyuki because I perceived them to be as described. Color placement helped create a realistic rendition per my Master nautilus photo.


For the peristome edge where the tentacles and fine organisms reside, I uses the tri-color assortment of 6/o seed beads in one of the TBS bags. I carefully placed the the dark ones near the center core and lighter ones towards the lower edge. Note the transition using three colors of beads.


For the rest of the body chamber, my Master photo showed wider taupe-grey chambers. I used the large butterscotch beads from the challenge along with facetted caramel-cores from TBS 2009. I needed large beads to make the transition from the very high pearl cabs to the peristome edge. From the mixed bag of colored pearls, I stitched down some grey pearls at either end of the butterscotch rounds, then smaller grey ones to shape the body chamber. The last chamber has a mix of ivory pearls and grey. Size and color mattered.

Most of my bead embroidery was done on the sofa while watching (listening to) television. Working in a more reclining position with a tray of beads on my lap allowed me to take my glasses off for close-up work. I can see better where to position the beads and insert the needle, but have to put them back on for reference and picking up beads.

It was a constant on and off with glasses as I filled in other beads from the bag. Some beads, i.e. yellow-lined frosted chicklets were hidden under other bead to help create a textured shaped. The bronze-edged twisted Corolla bugles filled in the last chamber. I also added a smaller twisted one from my stash. I kept building the nautilus with beads of every description from each of the bags. In the end I added the really large crow beads with random placement on top of previous layers of texture for zing and dimension.

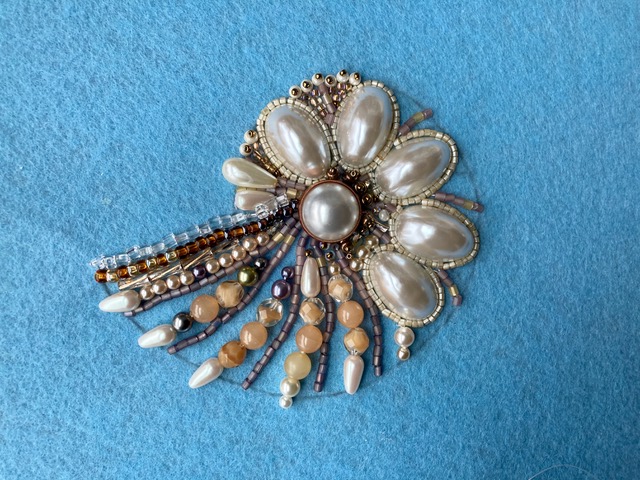
I thought I was finished late one night. I am showing of my finished Nautilus at 1:00 am.

The next morning I critically looked at my nautilus before framing it. The super textured lower portion overtook the sweeping nautilus whorl. I ripped off the glass triangle edge by the peristome edge. Then I proceeded to carefully add smaller ivory seed beads, metallic bronzes and stitching brass-lined crystal AB 10/o, 8/o and occasional 6/o seed beads to extend and shape the top pearl cabochon whorls. A few glass triangle on top added sparkle. In the end, I am satisfied with my bead embroidered nautilus.


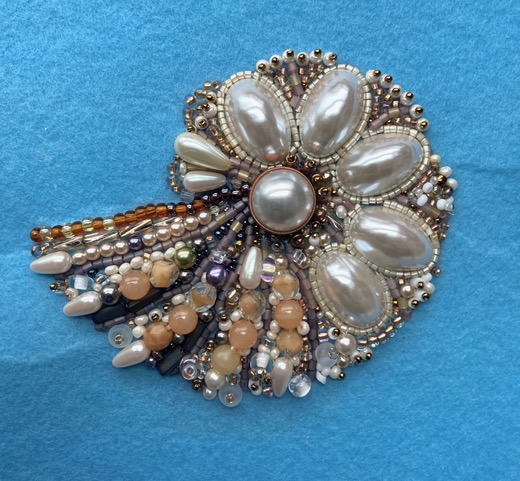
Assembly for framing

Time to frame and deal with elephant in the room, the fuzzy rhinestone cup chain trim. This required figuring the best position for my beaded nautilus and where exactly the trim should be. Careful pencil guides marked where to cut off the excess blue felt and stitch the cup chain.

Following my penciled line, I stitched down the cup chain trim carefully by coming up between the rhinestone cups. This underlined the nautilus and took care of the requirement of using everything in the Bag of Beads.

Rechecked the positioning of my nautilus and cut off the excess blue felt. I used some E6000 glue again to hold the heavy bead embroidery to the back board and attempted to press down the felt fold ‘cracks’. To try to flatten out the background, I added a few thin pins into the folds. Thank goodness the shadow box frame come with a canvas board one can pin into!


Voila! My framed Nautilus and Master inspiration. Nice to know the glass of the shadow box will protect my beaded Nautilus, but it is impossible to photograph because of glass reflections. I’ll put the glass in after the Feb 14th REVEAL to the Toronto Bead Society.

Here I am pleased I completed the 2024 Bag of Bead Challenge and have a third shadow box Nautilus to add to my bead room gallery along with 2023 Mid Century Modern and 2023 Secret Garden.


Friday, July 14, 2023

Secret Garden - 2023 TBS Summer Challenge

This Summer’s Toronto Bead Society (TBS) Challenge is “Secret Garden”. It could be an original  theme-based creation inspired by the book or movie. Or one could use the colors from the inspiration picture palette and have fun.

Secret Garden image and palette
Since the Secret Garden image was a really nice, I decided to literally recreate it by “painting with beads” in  a 3-bead net. It’ll be interesting to see all the other original interpretation by my fellow beaders at the August 9th Reveal online. 

This image was used in a book cover for Frances Hodgson Burnett’s The Secret Garden, published by Sovereign. Gillian found the picture and was able to extract color palette chips suitable for use in our challenge where one can choose to bead something non-pictorial, but within the Summer Challenge rules.

Dayak netted skirt trimmed with nassa shells (Textile Museum)

I have long admired pictorial netted beadwork of the Dayak tribes in Indonesia. The intricate symbols and designs seen in panels hung in doorways or inserted in baby carriers are netted a few beads at a time over a printed or drawn image. This technique was a practical solution to getting the basic layout for my garden to match the inspiration.

Beads

I was determined to use beads in my stash and really shocked how many variations of green seed beads I amassed! There were silver-lined (s/l) variations, opaques, yellow-lined, grape-lined bottle green and an aquamarine mix which needed to be separated to reveal the teal, emerald, spring green beads I needed for my foliage. The most effective beads from my stash were the Czech 8/o frosted beads with light green stripes because they closely matched the distant sky in the image. They were so magnificent, they determined the scale of my SECRET GARDEN!

Frosted green striped beads to start

The advantage of using mid-sized 8/o seed beads was the entire scene could be beaded quicker than finer Czech 10/o or 11/o seeds! I tested my 3-bead net idea using my lightest spring green AB 10/o beads for a few rows. The technical concept would work well, but the bright color was garish! At this point I rooted through my collection of size 8/o seed beads. Because they came from many sources, there were nuances in color, finishes, donut-shapes (some thinner than others), a boxy Japanese grape-lined bottle green. All diversity was perfect for “painting” my secret garden. The beads reminded me of mosaic bits of glass and empowered me to throw in an odd bits of color here and there to make my garden more alive.

Assortment of green beads

Note how I started off my garden in the same size as my printed photo, but netting tends to “shrink” because of the very nature of the way it is created. Since this was an artistic interpretation Summer Challenge, no worries!

First two rows
3-bead netting 

In netting, deciding on how many beads to string for the first row is a challenge because you need to visualize your turn around for the next row. Netting 3-beads horizontally is easy in Row 2 and establishes the start of the netted bead fabric. I started with a 5 bead turn on the right and 4 beads on the left. Later, I settled on four beads on each side. Sounds simple, but tricky when you’re actually beading! (This is when the push pin breaking-a-bead comes in handy for the edges of the top three right rows once they are already netted!)

Starting row 5
The photographs does not truly convey all the nuances in color. Wish I had translucent dark forest greens for the left side, but mixing s/l dark olive, bottle green with a bit of metallic seeds had to do! Did you ever notice all the different colors which come in a pack of navy iris or green iris? So many hues and shades to choose from one bead at a time!

Starting the light in the tower

Laying beadwork on top of image

The upper portion in between was light and frosted. The tower on the right started off heavy at the top, but was later replaced so there would be a single peak. The lights in the two windows was clever color placement within two 3-bead nets. Lots of trial and error as I was bead painting along!

Added point to tower

Then I remembered I had some 8/o opaque beads. BINGO! Teal green, green and an olivey color would be perfect for adding in foliage magic!

Opaque green beads to the rescue

The blossoming trees presented a bit of a challenge. How do I convey the sun-kissed lightness in the distance? Since I had very few coral pink 8/o beads in my stash, I discovered coral-lined 11/o would work well for the airy top. With a 5-bead string I could start the flowering tree, as the center bead would be a natural spot to transition back to my 3-bead net in medium-sized beads. This trick worked well! 

Adding coral-lined 11/o for the top of the blossom

Testing against the image 

I got carried away with netting in my hand and was visually “painting" with three beads at a time. The beauty and danger is the beaded fabric is reversible so each side looks great! As I netted in the right-handed direction, I flipped my Secret Garden over every time I came to the turnaround. Without referring to the inspirational image, I was improvising the blossoming tree, the distant lighter green centre, the darker trees. The first tree grew very large before I noticed it is time to complete it and start the top of the next tree in 8/o seeds. This part of creating my secret garden was liberating and fun. By having some elements established I could freely play off them free-hand.

Top blossom in progress

The reverse side

Slowly, I made my way down to the light path on the right and several trees in bloom on the lower left side.

Beading in hand

My pictorial section was finished, but not complete.

Pictorial netting done

Trim and loops

Since this was shaping up to be a banner, I trimmed it was a mix of two different shades and sizes of green daggers. A tiny fuchsia seed on either side give then zing because all the greenness would be too boring!

Adding daggers

Showing off daggers

To add even more zip, I added a huge fuchsia-lined lt. topaz 2/o bead on top of each dagger grouping.

Adding fuchsia zing

This way the FRONT was well defined. The reverse is nice, but the front is complete with a 3-D pop of flowers.

Front and back once the fuchsia beads were in place

Banners need loops to thread a rod through. My Secret Garden was begging for a natural material, not a skewer. Pussy willows from Palm Sunday blessing to the rescue! I found one with a reddish tone and cut a twig willow from the bottom.

Willow twig for hanging

The frosted green-striped beads were the innate choice for bead loops. A single-bead ladder stitch with one needle was the solution vs. stringing bead loops. 

Ladder stitching the first loop

I started by square stitching the first bead to the center ‘anchor’ of the string of beads. Then, I ladder-stitched on eight more seeds for a nine-bead tab. I created a loop by attaching the last ladder bead to underneath side of the center bead. 

Adding second loop

I reinforced it by stitching through the loop end and anchor bead and continued through the beads to the next string of beads. 

Securing the loop
This is where I was grateful for the well-defined banner Front and Back.

More than half of the loops done

The loops were large enough to carefully wiggle in the willow twig without disturbing the beads.

Sliding the loops onto the twig

Now, how to display my Secret Garden? Because it is two-sided, it could be hung in the window as a sun catcher, though it would be a speck in my fifth floor condo window.

In the bright light on my balcony

Better to place it in a shadow box frame as ‘art’. 

Shadow box frame ready to go

I like the canvas-foam base which comes ready with glass-ball pins to hang the artwork. A centering quilting ruler came in handy to figure out the spacing from the top of my netted banner and the sides of the beadwoven art. In went the two pins at an angle for the twig holder to rest on.

Quilting ruler to help center banner

Voilà! The different colors and finishes of glass seed beads remind me of mosaic tiles. This fact gave me the courage to pick up odd-colored beads and weave them in a seemingly random fashion. In my opinion, this is what make great art so wonderful!


Banner hanging against canvas

While the glass of the shadow box protects artwork, it distorts the view because of glare.

All framed up

Nothing beats outdoor lighting when doing a photo shot!

Presenting my SECRET GARDEN.

On the balcony


Enjoy!