pinterest pin it

Showing posts with label necklace. Show all posts

Friday, March 28, 2025

Balamuty Restring Project

Thank you to Natalka C. of Winnipeg for the opportunity to restring several small balamuty necklaces in a one-of-a-kind statement piece. Natalka hoped for an appropriate clasp to go along with her priceless balamuty and I had just the perfect ‘chepraha’ for the job.

I’ve been seeing more and more strings of balamuty for sale on social media and occasionally saw them adorning Ukrainian folk costumes. So, I welcomed the chance to work with these precious beads. But what are balamuty?


Balamuty defined

Roksolyana Shymchuk, the owner of Etno-Galleria and Museum in Lviv posted all about balamuty on her Facebookpage.

Balamuty are fossilized mother of pearl. (Ukrainian women were looking for an equivalent in their language to the German "mother of pearl - perla mutter" and chose the similar sounding "balamuty"). Veins of fossilized mother of pearl occur in a dense coquina, which is used as a building material in the Transdnistrian part of Ukraine (Vinnytsia region), the left bank of the Dniester, and in Moldova, on the right bank.

Coquina is a sedimentary rock that is composed either wholly or almost entirely of the transported, abraded, and mechanically-sorted fragments of the shells of mollusks, trilobites, brachiopods, or other invertebrates. It was formed in the warm sea around the coral reefs and atolls that lay in this region 25 million years ago.

Modern nacre/mother of pearl is much lighter. Balamuty are mineralized rock of sedimentary origin, and are heavier. For this reason, balamuty should be worn carefully, because the beads have the capability of splitting when struck.


Cheprahy defined

Mykola Hrabovetsky, wrote about cheprahy (singular-chepraha) in his illustrated Ukrainian article, “Hutsul zgards (zgardy) — unique spiritual symbols of the Carpathians”. 

Cheprahy were clasps used to connect the zgards (brass handcrafted cross-formed amulets) into necklaces. Cheprahy were two, mostly round, plates decorated with embossed or openwork ornaments. At first glance, the disproportion between the sizes of the cheprahy and the zgardy is striking. Cheprahy, as a rule, have large sizes, completely unjustified by their utilitarian function. Some of them reach 6-7 cm. in diameter, which indicates their special place among neck ornaments. 

Chepraha is a solar symbol designed to protect a person from evil spirits. In the central part of the chepraha decor, various variants of solar symbolism are placed: a wheel with eight, six or four spokes, concentric circles, etc.


I happened to have a reproduction of a six-spoked chepraha on hand. In 2012 I purchased it from Vsevolod Bazhaluk, a jeweller who cast reproductions of vintage Hutsul zgardy in Ivano-Frankivsk. He first reproduced them as a fundraiser for ATO defenders fighting in the early Russian invasion of Eastern Ukraine. My chepraha has a single loop on the underside like clasps found on zgardy in museums.

Its large size seemed to be the right clasp for a multi-strand balamuty necklace. You’ll see from my photo story how I was able to make it work. Most of my photos show the underside of the clasp and my problem-solving.
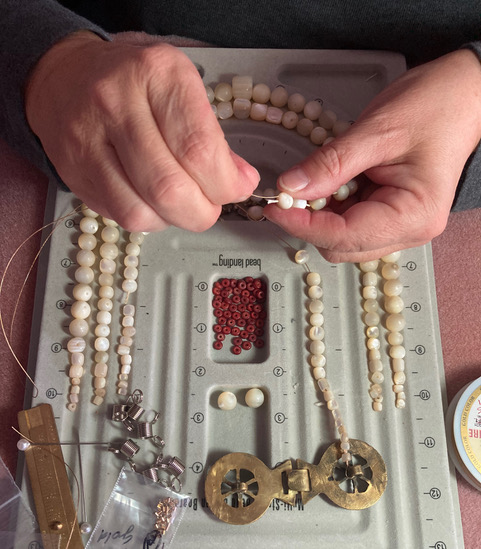

The task at hand

To create a multi-strand necklace meant cutting apart several short necklaces Natalka collected over a period of time.


A multi-strand Design Board was essential. Once cut, the balamuty beads needed to be graded with a gauge and by eye. I cut apart four necklaces and removed the reddish discs between the balamuty in one of them. 

The design board allowed for easily switching beads from one side to the other for balance. Smaller rougher-shaped beads were divided into six groupings between the backs of three strands. 

My necklace was designed to showcase the larger balamut bead in front with a gentle decrease in bead size for a comfortable fit around the back of the neck.

I used a gold color nylon coated 19-strand .018 Diameter beading wire for this project. When working with wire, it was essential to have spring clamps to stop beads from escaping. As a standard practice, it was best to cut the wire longer for easy looping around the clasp and weaving the tail in further inside. 


Adding the Chepraha clasp

It was essential to use crimps with beading wire. I used gold metal crimp tubes which are soft and easily flatten to grip the wire once crimped tightly.

When adding the clasp, I used a longer wire and strung one crimp next to the clasp and placed another crimp tube further into the string of beads. Once I pulled the wire was through the clasp loop, I threaded it back through the first crimp and further into several beads. Then I pull the wire to tighten the wire around the clasp. 

Using crimping pliers, I flattened the two tubes to grip the beading wire securely. (The pliers are designed to fold over the flattened crimp, but I do not have the skill for this step.) Once crimped, I proceeded to push the remaining wire tail inside the bead string for security. Finally, I clipped the excess wire closely between beads to prevent scratching.


Once one side was secure, I strung the beads laid out on the design board. To easily transfer beads from an old necklace onto the wire, I created a bridge to slide them over, as shown.


FIRST string

Once I strung the FIRST balamuty string near the neck, I needed to repeat the clasp securing process in reverse. Inching my way towards the clasp, I had to add a crimp tube before the final bead, then add another crimp tube next to the clasp loop. 


To secure the clasp, I went through the closure loop and back through the crimp tube, bead, crimp and down a few more beads.


I pulled the wire taut and proceeded to flatten the tubes with crimping pliers.


Finally, I pushed the extra wire down a few more beads and cut away the excess.


Now, the wear test! How does the first string sit, look? My husband took this photo so I could illustrate the importance of fit-testing. I sent this photo to my client to get approval. Natalka confirmed this length was perfect!

FYI: If she would have wanted a longer balamuty necklace, I would have had to cut apart the fifth necklace and distribute the beads into three strings.


SECOND string

Securing the SECOND string to the clasp was done in exactly same way as the first.

I started with a longer wire, strung the beads and crimp tubes as described earlier. The important thing was its placement of the underside loop. I then threaded the wire back through the crimps and beads. It was vital to make sure the FIRST string was on the side near the clasp closure hooks.


I pulled the wire to tightened it into position in the center of the clasp loop. Once taut, I flattened the crimps to secure the start of the SECOND string. 


Next I proceeded to string the balamuty as I had laid them out. Securing the other side of clasp exactly as I had done the FIRST string. Only exception was to make sure the wire with crimps sit in the center position on the underside chepraha loop.


Here I am testing the chepraha closure and how the two stings of balamuty look when worn.


THIRD string

Securing the THIRD string to the clasp was done in exactly same way as the first two strings. The main thing was to position the loosened wire with beads and crimps in the outside position on the underside chepraha clasp, as shown. 


Once positioned, I pulled tightly and crimped firmly to secure one side. Then I strung the balamuty as laid out on my design board. 


I had to be careful in securing the other end to the outside position on the underside chepraha loop, as shown.


Next was the test to see how the balamuty laid and hung when worn. Here I am in front my favourite painting, “Gerdany-makers” by Christina Yarmol. 

I see a larger gap between the first and other strings. Perhaps the single larger beads in the two lower strings are pulling down more than the even-sized round balamuty in the first string.


DROPPING DOWN FIRST STRING

In order to minimize the gap, I carefully opened the flattened crimps with pliers to release the wire from the clasp. I needed to cut a new longer wire so I can redo the FIRST string. For this I would need to add a few extra beads on each side. 

I looked through my stash of beads for clear or pearl-colored pony beads to add behind the clasp so that the balamuty can drop down below the chepraha edge.

See the photo for the beads I used to extend the FIRST string. Compare it with the original SECOND and THIRD strings.


I secured the extended FIRST string on the other side on the inside of the clasp near the closure.


FINAL TEST

I tried the balamuty necklace on again. My husband photographed the chepraha closure from the back. It really is attractive and fitting for a multi-strand balamuty necklace.


Here I am modelling the new improved balamuty necklace against my inherited Hutsul ceramic and incrusted wood collection. This is very fitting for a necklace with a chepraha from the Carpathians.

Looking forward to getting together with Natalka to hand over her balamuty necklace to wear as a protective amulet for many years.


Friday, July 5, 2024

Korali Restring Challenge

It was an honour to create Korali, a multi-strand coral necklace in a traditional Ukrainian-style for a client in Winnipeg. This is the first of four projects. 

Red coral was a traditional element of Ukrainian folkwear, extremely highly prized and cherished. It was not only an ornament showing status, but also an amulet of protection, a talisman of health and beauty. Here is an article about Ukrainian neck ornaments.

Coral was brought to Ukraine from the Mediterranean and Red Seas. Its price depended on the color, quality, size and shape of the bead. The most expensive corals were red, smoothly polished, perfectly oval or barrel-shaped. Coral comes in many grades, shapes and sizes and is sold by weight. In Ukraine, coral beads were traditionally strung on thread and from 1 to 25 strands braided into ties for multi-strand ‘korali’ necklace. 

Simply put, coral is a “garden of the sea” organic gemstone mostly harvested in the Mediterranean Sea. Calcareous coral ranges from red, pink to orange. It is known to fade with wear and tear. Unhealthy corals show fewer colours, more algal symbionts, more breakage and often are bleached white. 

The challenge was in solely working with the materials (coral) provided in several necklaces and a bracelet Natalka acquired over time.


CORAL SOURCES

Head side of ducat of Franz Josyf


A prized ducat of Franz Josyf from 1900 was going to be the focal of a single strand of coral. The reverse of this coin is more interesting as a focal today, however Natalka can choose which side to wear in front. 

Reverse of ducat of Franz Josyf

This coin is called a ‘moneta’ in Ukrainian. Some refer to it as ‘zgarda’, an amulet to protect the wearer. ‘Zgardy’ were traditionally metal Hutsul-style crosses linked with spacers or beads, but in other regions ‘monety’ were also called ‘zgardy. 

The large coral bead with the metal cover (seen in above photo) was going to be front and center of the lower multi-strand.

Flower box clasp

They don’t make box clasps like this these days! In its previous life this two strand necklace was a nice accessory to go with contemporary fashion of yesteryear.

Graduated coral beads and old box clasp
 

This three-strand bracelet yielded a lot of graduated coral beads. Again this is an older bracelet because they don’t make box clasps like this today! 

Three strands to two stands to one strand

This three-strand necklace handled the problem-solving of reducing multiple strings into one string at the back well, but lacked the traditional Ukrainian soul. This definitely begged to be taken apart!


DESIGNING KORALI ON BEADING WIRE 

Vellux-covered dining table 

Once all beads were released on my vellux-covered dining table, I cut 1 meter long beading wire strands to start designing the multi-strand necklace. Picking up beads using the flexible beading wire is easy, as is rearranging their order. Spring coils are essential for keeping the beads on the strings while working. They could be easily removed to reorder the sequence of shapes and sizes. 

Centering larger beads

A metal 24” ruler helped with the centering of the larger beads. The single metal covered coral was going in the middle of the longest 23” string. The bracelets provided large center beads for three more strands. Each strand would be 1-1/2” shorter than the string before. 

Hard at work


It was a slow, tedious process as the shapes and sizes really varied. 

Seven strands done

Slowly I managed to string seven (7) strands which each one decreasing an 1-1/2”. This was important for when I was to drape them into a necklace.


RESTRINGING ONTO THREAD 

Restringing onto thread

Once the strands were set, I cut #4 beading thread from BeadSmith into 2 yds. long threads for restringing the beads. The math was: 24” length + (6” end + 6” end ) x 2 double = 72”. (In hindsight, I would have cut the threads 3-4 yds. long because braiding the ends gobbles up a lot of threads. (You’ll see what I mean in later photos.) 

Thank goodness for The ‘BIG EYE” needle which was easy to thread and thin enough to go through the tiny drilled holes in organic coral beads of all shapes and sizes. I centered the needle and proceeded to slide off the beads from the wire onto my needle and double thread. I added smaller round coral beads to the ends because several strands were going to be tied into one knot. 

Gathering strands

 Very carefully I gathered the strands together and them proceeded to tie them into a circle knot. 

Making a circle knot

Using a hat pin helps place and tighten the knot. I repeated the same procedure to the other side. This was a nerve-wrecking step!! 

Preparing to braid threads

Once both sides were secured, I divided the threads into three groupings for braiding.

Braiding threads


I started braiding the threads. It was important to maintain the same tension and plait as evenly as possible. Since the braiding process gobbles a lot of thread, my braid was too short to easily tie when Natalka would want to wear the Korali. 

One braid done, but then unbraided

SOLUTION

Adding longer thread


I undid the original thread braid and introduced a much longer orange thread by tying in next to the knotted #4 threads.

Preparing to braid with added longer thread

Again, I divided the threads into three grouping and start braiding. This time it was more challenging because I was getting whiskers as I was braiding the longer orange threads together with shorter red ones. I trimmed away the short thread whiskers. This was not ideal, but necessary so that longer ties would be easier to tie on the multi-strand Korali. 

Completed seven-strand Korali

Completed seven- strand Korali necklace is ready to wear. 

Looks great with black turtleneck

I tied on the Korali to test out the look and feel of them. I am pleased that a collection of random necklaces and bracelet have the look and feel of a traditional coral necklace. The more strands, the better!


THE MONETA — ZGARDA

I’m grateful to my friend Adele Kodonova’s offer to help me while she was visiting from the Czech Republic. 

Adele's workstation 

First of all, I was impressed to see how she works. Adela prefers to bead on a kitchen towel which provides an ideal beading surface. She preferred beading with a needle and thread rather than wire and crimps, especially when the coral beads had such small holes. It was impossible to pass a wire back down coral beads to reinforce. 

Drawing plan for adding seed beads

Adela’s solution to finishing a necklace of beads with small holes with a needle and thread. Add seed beads at the ends to be able to turn around and secure the thread further from the clasp. Here Adela was sketching out the plan. The coin is still on wire. 

Drawing plan for finish and secure clasp

When working with thread, secure a folded thread around a clasp with a slip knot. Then start stringing through the seed beads, then the coral beads. Once she got to the center, she paused to figure a solution to make sure the heavy coin laid in line with the coral beads. 

Testing the use of seed beads with the coin

Adela strung a few seed beads, then slid the coin’s tubular soldered ear onto the coin. Then she tested the necklace to make sure the coin lay properly with the seed beads filling the tube. 

Hanging test

I’ve learned many tips and tricks from Adela and know the Moneta - Zgarda is well made! 

Using fine thread loop to pull through thicker thread

Next came completing the string of corals. Then adding the seed beads to balance the necklace, as well as providing a large enough space for the needle and thread to pass back through to knot and secure the thread. Adela had a trick for pulling a thicker thread that cannot be threaded on a fine needle. Creating a loop of fine thread for the heavier thread to pass one bead at a time worked well. 

Completed necklace


We chose a .925 silver toggle clasp with and M-bar. The detail in the clasp coordinates with the reverse side of the coin. To finish it off, she knotted in between seed beads to reinforce finished the korali string perfectly! 


FINAL LIGHTER KORALI STRAND 

Since coral is an organic material which fades with wear and tear, I was sorting out lighter whiter beads out of the mix from all the coral beads I was restringing into the multi-strand Korali and Moneta necklaces.

I believe the lighter corals are still valuable because they are natural. I wanted to return them to Natalka in form of a strung necklace. Again, Adela strung it on thread. To make it easy to put it on, she created a little dangle of coral on a head pin. She attached it to the closed jump ring for an easy find and ability to dress herself.

Little dangle of coral by the clasp


I am grateful for Adela’s help to finish off smaller necklaces.

This has been a wonderful challenge and a hands-on opportunity to work with coral in different shapes and sizes. I now have a whole new respect when I see vintage coral for sale. I note how they are shaped, their color and sizes. I pay attention to how korali are strung. Thank you, Natalka!