pinterest pin it

Sunday, November 29, 2020

Beaded Anklet Remake

The best way to grow as a beader is to take on challenges where one can figure out how unfamiliar stitches go together while bringing a cherished memento back to life.

My friend, Naomi Smith, was looking for someone who would tackle the following: "A lady reached out and wants a remake of this beaded anklet. This anklet has sentimental value so she’s retiring the old one and will wear the new one."

Original Anklet

I took up the challenge. Naomi and I selected 11/ Czech seed beads in matching colors to the original. Next I sketched out the pattern on a slip of paper.

Mosaic Pattern Sketch

To me it looked like a mosaic (Peyote) pattern which I knew would be a unique start. I tied on a colourful stopper bead and proceeded to pick up the first beads. Since it's a tricky start. I even used a needle in the first row so I could keep the rows straight.

Mosaic Start

I found the 'V' pattern skewing! There's no way this would allow me to add the star fringe and picots!! My Beading Circle friends suggested I try using the brick stitch instead to recreate the pattern in the bracelet.

Comparing Mosaic v. Brick

Every brick stitch begins with a ladder stitch. On my third try, I got the base pattern right!! 1 White (W), 2 Teal (T), 1W,  1T, 1W, 2T, 1W, etc.

Next I figured out the way to get the second row to sit centered on the previous row and was happy with the stubby 'V' taking shape.

Adding Second Row in hand

The idea of the brick stitch is to pick up a bead and pass the needle through the edge thread of the previous row. By returning back up through the new bead, it secure sets the new one into place. This is wonderful for pictorial patterns and gradual 'V's. I like working in hand. Here is a link to a YouTube tutorial for brick stitch

Pulled Second Row in Hand

The magic is happening! 

Third Row

Super satisfied that the beads were falling into place and the pattern is matching up to the original anklet. I didn't finish off any rows until after the fringe trim was complete.

4th Row Added in Hand

ADDING STARS AND PICOT FRINGE

Once I had the desired length, I folded the beadwork in half. Then, tied on a stopper bead a wingspan (1.5m) from the bobbin thread and put the bobbin and rest of the beadwork into a ziploc. (An oversize bobbin flip cover would probably be more graceful!) 

Starting at the very centre of the beaded band, I worked my needle and thread down the centre of the brick-stitched beadwork. Upon emerging I started to create the star fringe. I found it best to seamlessly make the stars as you bead the fringe trim from the centre out. 

First I picked up the sequence of seed beads to drop down the star. Then 10 White beads for the centre of the star. Once the circle was formed, I could make five points as I went around.

Adding First Star in the Centre

The last star point is set when you insert the needle up the strung beads. Continue up through the brick beadwork in the direction of work. 

Finishing Centre Star

There are two seed beads between each fringe along the lower edge. Come out from the third bead away from the previous fringe. Pick up 2W, 2T, 2W for the string and 3T for the picot. As you turn around and insert the needle ups the string of 6 beads, a picot is formed. Tension is important here. If you pull the fringes too tight as you're working, they shoot out sideways; if too loose, they sag. 

Fringe in Progress with Bobbin in Ziploc

CREATING STAR FRINGE

Pick up 2W, 1T, 2W, 1T, 1W, 3T for the string and top point of star.  String 10W more to start the centre of the star.

Star in Progress

Form a circle by going through the first white bead. String 3T, 1W for first point. Turn around through the first teal bead. 

Start of First Star Point

Tighten for a white tip. 

Tighten Tip

String 2T and pass through the second white circle bead. Repeat 3 times for a total of four points. To complete the star, string 2T and go up through the string of seeds suspending this star.

Finishing Last Star Point

FINISHING ANKLE BRACELET

Once all the fringe trim was completed, I lined up the old and new beadwork to study how to finish off each end. Remember, I never secured anything because I did not know how my new beads would come together. I had to finish off each row individually, add and bead or two, weave in the ends. From the outside edge rows I strung on beads for the closure loop. I mimicked the previous loop exactly and reinforced it with a few passes of thread inside. For the button closure, I was not thrilled about recreating a beaded bead. Luckily, there was an oversized bead sitting in the ledge of my beading table! I added it and reinforced it a few time.

Finishing Ends

When I went to test the closure, I added a few stitches across the loop to tighten it when the large bead goes through. This is always tricky! Ideally, you want a bit for friction so the bracelet wears well. Since this was an anklet, it has to wear well!

Lastly, I needed to transfer the dragonfly charm from the old to the new anklet. This was loaded with memories. You could reproduce beadwork, but not the charm!


Reproduction Finished

Sunday, Nov. 22nd we drove through the first snowfall to Erin, ON to personally returned both anklets to Marjorie Wells. The original was a gift from a friend. Marjorie wore it all the time in sandal-weather. There was a lot of wear and tear and many repairs. The dragonfly was added three years ago in commemoration of her husband after the minister told a beautiful story of a dragonfly when trying to make sense of a dear grandfather's passing to children. The dragonfly is integral to the story, while the original beaded anklet is laid to rest in Marjorie's Memory box.

The Old and the New

Now that I had firsthand experience with the pattern building possibilities of the brick stitch, while perusing on Facebook a gorgeous bracelet beaded by Olya Kril, a bead artist in Ukraine, caught my eye. I complimented her and asked which stitch did she use to get this amazing result. Mosaic? or "like bricks"? 

Olha confided that she was inspired by a Pinterest posting. The best way for her to achieve pleasing results was by the brick stitch.

When she linked to her inspiration photo on Pinterest, I laughed. This was a pattern to the Peyote stitch using Miyuki Delica beads from Japan. What a small world!

Moral of my story: Test out techniques for achieving the mosaic look. For Olya and myself, the brick stitch work best with Czech seed beads. Seems like cylindrical beads work well for wide Peyote patterns.

Tuesday, September 29, 2020

Eva's Lemko Costume

Eva's 'kryvulka' returned

My Canada Day 2020 visit to deliver a restored 'kryvulka' to Orysia Sopinka yielded unexpected riches.

To this point, all I had seen was the broad collar 'kryvulka' beaded by Orysia's mother, Eva Vakyriak, an ethnic Lemko from Chystohorb, an administrative centre of Komancha, within Sanok County, in the Subcarpathian Voivodeship of south-eastern Poland, close to the border of Slovakia.

Eva Vakyriak (1920-2014)

As was the custom, girls would bead, embroider and sew their own folk costumes for festive occasions. In keeping with tradition, young Eva created her very own ensemble comprised of all essential elements of a Lemko-style costume. We know she would have started her accoutrements as a teen because in 1939 she was off to work in Germany as an Osterbeiter, a slave worker.

Orysia displaying Eva's 'lajbychok'

Orysia pulled out a 'lajbychok' (vest) her mother beaded. She kept referring to this fabric work of art in the diminutive form. You could sense the endearment. The more I looked at the 'lajbek' style common in this area, I saw Eva's 'lajbychok' was more refined and one-of-a-kind.

back of 'lajbychok'

Her 'lajbychok' was made of navy fabric with a jacquard weave. This would have been been an expensive purchase, but justifiably worth it! The vest was lined with a loomwoven natural fabric. Great care was taken to cut out the fitted vest and individual tabs which were lined in navy.

detail of lower back beadwork

Using a wide palette of seed beads and bugles, Eva bead embroidered a large floral composition on the lower back. It's sitting on a yellow-outlined ground. The floral bouquet is framed with an arch of star bursts and delicate daisies. I recognized some of the seed beads as spares from her 'kryvulka'. While the arch around her floral composition is fanciful, the floral bead embroidery of every tab is symmetrical and identical. The tabs were perfectly overlapped all around the base of the vest.

beadwork around armhole

Very delicate beaded daisies and bugle V's were embroidered around the armhole opening, neck edge and down the front. 

Smaller florals mirror each other on the 'lajbychok' front. They are sitting on a green-outlined ground.

Check out the floral buttons!! They're probably from Czechoslovakia where pressed-glass buttons are a specialty.

The inside of the 'lajbychok' reveals Eva used a natural thread to bead embroider through the navy and lining fabric. There was no extra satin lining to cover the stitches. 

Then, Orysia brought out her mother 'spidnytsia' (skirt). She first showed the front which was flat with a plain fabric insert. Really, this was a practical solution to keep down the bulk as a decorative 'fartukh' (apron) would have been worn overtop in front.

The skirt was a red printed fabric base which has rows of lace, blue and yellow ribbon stitched down on either side of a natural band. Great care was taken to use the red fabric as part of the striped design. Once the bands were stitched, the red fabric was densely pleated with fine tucks hidden up inside a wide natural fabric band. This made for a very full 'spidnytsia' on the sides and back. A little strip of a similar printed fabric was used to bind the edge of 'kryvulka' so it could be comfortably worn as a collar with the ensemble. (See Lemko 'kryvulka' restoration post)

The 'spidnytsia' hem was finished in a narrow printed navy fabric. It must have been machine stitched on front and fold down and around to the underside. Perfect hand stitches secure the roll-like binding in place.

In these three main elements you can see the harmony of red 'kryvulka', navy bead embroidered 'lajbychok' and the red 'spidnytsia' with ribbon trim. These elements are part of the Lemko-style costume, but Eva creatively embellished each one her way.

Being able to see such beauty up close made for a truly a memorable Canada Day!

As I was preparing my blog, I wanted a photo of Eva (seen above). I started to question how did Orysia come into possession of these original pieces her mother made, if she left in a hurry to work in Germany?

So, I asked....Here's Orysia's story: 

"I went to Dibrova, Ukraine for one day in 1975. Dibrova is a tiny village near Berezhany, Ternopil oblast. Several families from Czystohorb ended up living there after they were forced to leave Czystohorb, by the communist Poles (Aktcja Wisla). An ethnic cleansing had started a few years earlier and mama's family (the Vakyriaks) kept hoping that they would be able to stay in their new home which dido renovated in the thirties. There was a new metal roof on the house that showed the family had some wealth and it was a place for important visitors to stay. 

Mama left either in 1939 or in 1943 for Germany because she was summoned by a person from the government to go to work. She did not say good-bye to anyone, packed her wooden suitcase and left because the man said if she left right away, it would be better for her because the war was just beginning and later on life would get worse for Ukrainians.  

I (Orysia) was a student at an interpreter's school in Brussels, Belgium in 1975 and decided to go to Ukraine to visit family. My destination was Ternopil and after a very long train ride, thorough inspection at the border town Chop and a change of trains, I travelled to Ternopil and stayed with my aunt and uncle. Uncle Ivan took me clandestinely to Dibrova by taxi and I spent a few hours with my baba who was surprised to see me, but treated me kindly and offered me mama's Lemko clothing. She gave me her kryvulka, her skirt and her lajbychok.  There was an apron made out of the same cloth as the front of the skirt and I refused to take it because it looked well used and was not attractive. Today, I'm sorry I about that. Later on that year, I returned to Canada with it."

Maria Sopinka wearing a 'sylianka'

Orysia also brought this photo of her aunt wearing a beadwoven band with motifs which was fashionable in the 20th century. 

Orysia writes: "Maria Sopinka was born in Vyslik Velykij probably in the 1920's.  My father, Teodor Sopinka was her half brother. He was the youngest child, born in 1917, from the first wife and Maria was born to the second wife. Vyslik Velykij was the largest town in Lemkivshchyna with a population of about 2,000 people. Both mama's and tato's families were Lemky and strong partisans for an independent Ukraine. Tato's family ended up in Bila Krynytsya near Pidhajtsi, Ukraine and Maria escaped through the forest and crossed the border to Slovakia." 

I am grateful to Orysia for allowing me to share this story of a very patriotic Lemko family whom I got to know about through my interest in all things beaded and folk art.

Sunday, September 27, 2020

Lemko ‘kryvulka’ restoration

'Krvyulka' in the round

I was thrilled when Orysia Sopinka asked me if I could restore her mother’s ‘kryvulka’, a precious keepsake and a piece of her cultural identity.

It was a privilege to get up close, to study the thread paths of an incredible traditional ‘kryvulka’ beadwoven by young Eva Vakyriak (1920-2014). This was the ultimate adornment for the Lemkos, a ethnographic Ukrainian group and Eva made her own for festive occasions. 

Netted section ruffles when 'krvyulka' is straightened 

Eva would have beaded this as a teenager in her village of Chystohorb (Czystogarb), near Komancha (Komancza) in today’s Poland. In 1939 she left home forever to be an Osterbeiter, a foreign slave worker in Germany. 

Orysia brought this to me in January 2020. Right away I said this ‘kryvulka’ has a lot of stories it could tell. So, here is what I gleaned from my restoration experience.

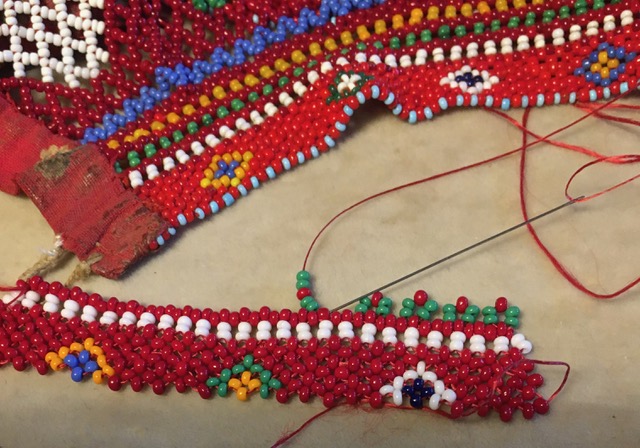
A ‘kryvulka’, the local term in Komancha, is a ‘kryza’, a broad collar comprising of four distinct sections:


A - ‘polotnya’ - top choker-like band usually, a right angle weave, using two needles or one today in the R.A.W. stitch. 

B - vertical netting with rhomb motifs. This then attaches to the ‘polotnya’ choker.

C - horizontal ‘zigzags’, rows of 5 beads going through the center of the previous row  bead net to expand the width of the broad collar one colored row at a time.

D - ‘gombychky’, large accent beads used to trim along the lower collar edge.

Eva ran out of large blue ‘gombychky’ beads and finished the trim with blue seed bead picots. She added a printed fabric to encase both ends so she could add a button and snap closure so her ‘kryvulka’ wears comfortably as a collar. Without this, the wide beaded net ends would fold over forward while wearing. 

Fabric encased ends

The best way of learning how something is constructed or beadwoven is to have to repair it! While it may seem sad, this is the best way to learn!

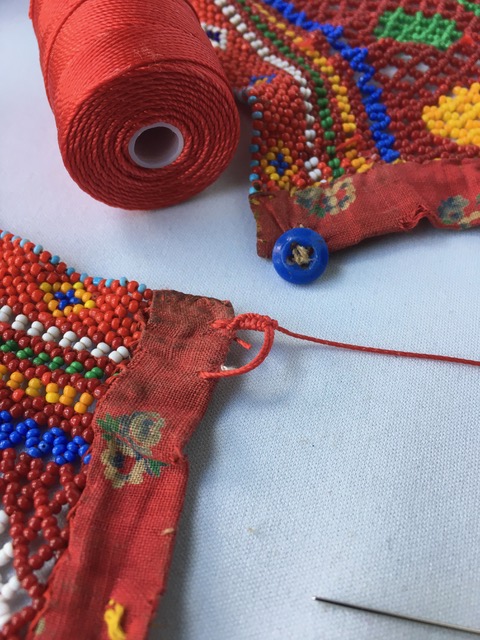
The entire ‘kryvulka’ was beaded with a red thick thread. Because of the tight tension, one wouldn’t notice missing beads or tears in places. Previous repairs would be with whatever beads colors were available. It was a challenge to repair in places because of the thickness of the thread/small size of the bead hole. Many fine needles broke in the process. I finally understood why there were knots and thread tails in places. It was a way to secure new thread, fill in beads and try to discreetly reinforce the addition.

I started repairing the netted motifs. One had to carefully add two beads above and below the mesh points in the vertical netting. Once the green rhomb net was repaired, I repaired a few more tears around.


By reconstructing this collar, I could clearly see how the ‘polotnya’ choker was attached to the top of the netted rhombs. It’s as if they were zipped together.


Though the horizontal zigzags are created with 5 beads as you expand the broad collar, when you repair tears, you simply insert two beads in between points as seen in the white row. 


Similarly for the blue zigzag row. In a previous repair red seed beads were inserted. Better red than have a tear! I wanted to change them back to a distinct blue row. 


The fabric closure needed cleaning so I gently ‘washed’ it with a cotton ball with detergent. When I saw the print lightening, I stopped and let it air dry.


The thread loop was badly frayed so I used a red cord to make a new loop. Thank goodness I remembered hand sewing basics my mother taught me!! 


I sewed on the blue button with red thread and reinforced the snaps on the fabric tab.

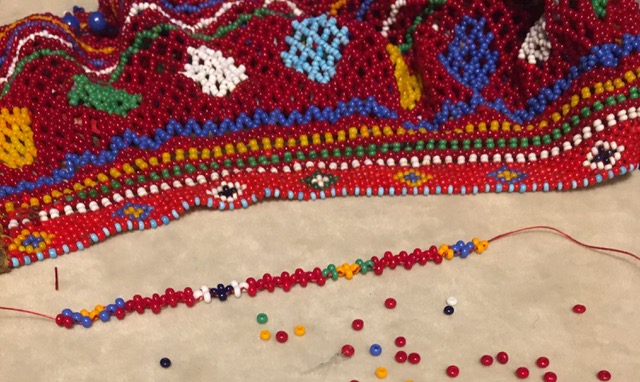
This was it for the reconstruction, but I wanted to figure out how to bead a ‘polotnya’  with extra 2-bead stack rows meant to be joined to the rhomb net.

Instead or using the traditional two-needle method, I tried beading the center row of diamond motifs using Right Angle Weave (R.A.W.) with one needle. You can see my turn-around progress and motifs.


It took a while to figure out how to make 2-bead white stacks. Then how to add a single red bead to connect the stacks. Afterwards, I added a single red bead between the red bead edge. This created a solid red line.


Next was a row of 2-bead green stacks. These went faster using the same methodology, as above. 


Lastly, a row of 2-bead yellow stacks. Same start and solid red finish.


At this point, I was so happy “I got it!”. I photographed this from every angle and asked Orysia permission to use her ‘kryvulka’ with my R.A.W. reproduction for the cover of my personal Facebook page. I am a beader and I love red with intricate motifs. 

On June 15th I completed a massive update on Rypan Designs website on occasion on my 25th anniversary of teaching. 

July 1st, Canada Day 2020, I delivered the reconstructed ‘kryvulka’ to Orysia. What she showed me will be in my next blog. Here’s a sneak-peak.

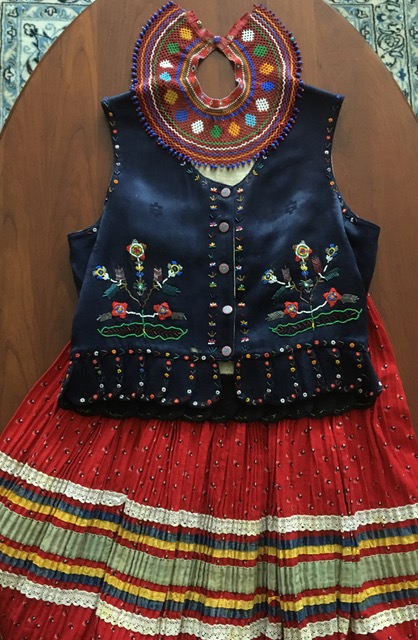
Lemko ‘kryvulka’ and ‘leybychok’ (vest) beaded by young Eva Vakyriak.