A loom is a hand-operated or power-driven apparatus for weaving fabrics, containing harnesses, lay, reed, shuttles, treadles, etc. (
dictionary.com)
Loomweaving beads requires a simpler loom with no need for extra device. Just something to hold the warp threads strung. And then the weft threads are created as you weave. The beads are secured by tying on thread. Picking up beads, pushing
them up between the warp threads and securing them by passing back over
the top of the warp threads. As seen on the loom used to loomweave these kimono panels. The panels then are stitched together like fabric to create this amazing kimono.
 |
| Panel in progress on small simple wooden loom |
I’ve seen many different styles of looms with each artist sincerely believing their version is the best. They are absolutely right in their claims. Because there are so many styles and global commuities who do loomwork, looms come in all shapes and sizes. For loomweaving you need a long or expandable loom to string the long warp threads which are secured to coils, combs or nails at both ends of a basic loom made of wood or a fancy high tech Mirrix loom.
Some loom manufactures claim the loomwork created on their loom can be finished by simply pulling in the warp threads.
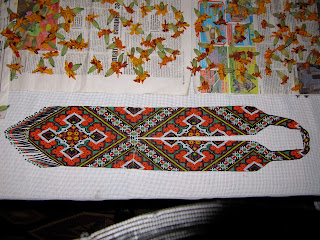
Other styles embrace the warp threads that can be finished in fringes. Or tied into elegant swags. This is the case in in the Ukrainian -style of ‘gerdany’ which I teach and and have
patterns for.
 |
| Leaning long wooden loom against table for a more comfortable work environment |
 |
| Adding fringe to finish warp threads on lower edge of medallion |
 |
| Joining warp threads to make swags |
I’ve had the pleasure of taking a loomwork course with
Don Pierce. The creator of “Larry the Loom” which can be tilted for comfortable loomweaving.
Vyacheslav Kalejnikov builds his own window frame looms which are an
ideal height for weaving while sitting on a small stool. He uses found
objects, i.e.curtain pulls for the top and nails along the lower edge
where he can wrap warps threads around. He prefers to do large scale
projects. Note the aids used to make sure he picks up the beads one row
at a time. Vyacheslav prefers to use 2cut beads which tend to stretch
out faces.
 |
| Vyacheslav working on his custom loom |
Because of the distinct differences of
seed beads, you need to be consistent by choosing either the more
donut-shaped Czech seeds v.s. rounded squarish-shaped Japanese seed beads.
Mixing them together in one piece could cause unevenness. Cylindrical
beads, i.e. Delica® or Aiko® should be used on their own. It has a
complete different feel than a piece loomwoven with seed beads. Use nylon beading thread, i.e. NYMO or C-LON for the warp and weft.
Early bandolier bag makers used a wooden loom to create beaded designs
which were then applied to the bags. Artists strung beads on the loom in
a series of parallel lines, a process that made it difficult to create
abstract or circular designs. Consequently, most pattern woven on the
loom are geometric or linear.
.jpg) |
| courtesy Jean Upton |
Master craftsman Maria Chulak of Pyadyky, Kolomyya Region, Ukraine shows off her ‘gerdany’. These are stylized. The motifs appear to be floating and a few are loomwoven in contemporary fashion color.
Originally there were no such things as loomwork patterns. Traditional embroidery patterns were used for reference. Opaque seed bead were matched to the embroidery thread color. It’s interesting to see how the old became new again in 2011. Solid loomweaving of the embroidery pattern recreated in Czech seed beads.
 |
| An assortment of stylized 'Gerdany'with traditional motifs' by Maria Chulak, 2006 |
Here we prepare to weave a medallion style piece:
 |
| Aligning the woven bands to prepare for weaving the medallion |
 |
| Maria and Grace show off a loom with folded band ready for weaving medallion |
From my 3 week Looomwork series that I taught at
beadFX earlier this spring.
 |
| Matiss, 9 year old, managing his beads |
 |
| Matiss' work in progress |
 |
| Maria and her amazing students at beadFX April 2013 |
If you are interested in learning my style of loomwork I will be teaching a
3-week series again this fall at
beadFX.
This entry in our creativity series was prepared by Maria, but blogger was not letting her create, edit and post it. So I have been Maria's tech support.
Hope that you will look at loomweaving with beads as a creative possibility.
Happy Beading!


.jpg)


