pinterest pin it

Showing posts with label bracelet. Show all posts

Saturday, August 7, 2021

Electromagnetic Radiance - Summer 2021

This summer’s Toronto Bead Society (TBS) challenge was not your usual pastel palette! Marilyn Parker presented us with a spectacular sunset photo with deep moody color extracted along the lower edge.

The moment I saw it, I remembered vintage glass tiles tiles I bought at the Bead & Button Show fifteen years ago. Stone Mountain Colorado brought many intriguing beady treasures from around the world to the Milwaukee show! I treated myself to these mini works of art, which look like lampwork glass squeezed into tile molds. No two are the same! The obvious thing to do with these tiles was to string them on two stretchy cords! But no, the tiles just sat in a drawer until this challenge!


Lampwoork tile booch 

I pulled out my tiles and laid them on the inspiration photo. Blue and red create purple when mixed and in my mind's eye. The yellow was like the sun! And further mixed by eye, a sunset! This is it!! I’m going to make the tiles work and finally have something I can wear!


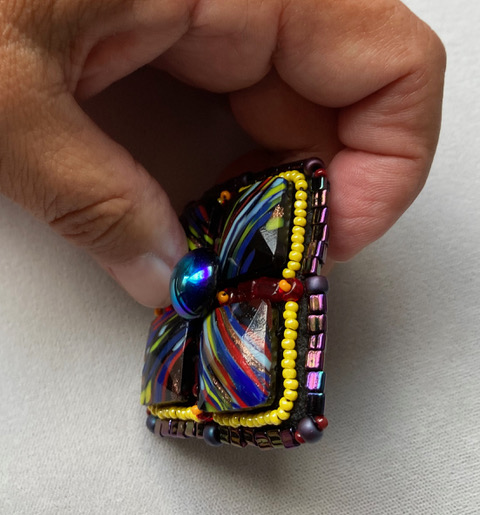
How many tiles do I need for a bracelet? What’s left? What can I do with four tiles? Bead embroider a brooch was the only answer. Glad I had a black stiff-stuff base to stitch down the tiles. Because they were facetted and thick, I arranged them diagonally into a cross. Then, stitched down a Czech glass button as a centre focal. For zing I secured a large red pony bead with an orangey charlotte bead at the base of the turquoise glass button. Next, I stitched down two red mini chicklets between my tile cross.

Added the same orange-topped red pony bead to the end of each row. Next, I stitched down a row of warm yellow charlottes around the tile ensemble.

Single matte purple iris pony beads were added to the corners and the ends of each arm of the cross. Since purple is the complimentary color of yellow, my brooch began to visually pop!! I added triangular Miyuki beads around the yellow seed border to add more texture to this heavy brooch. Seed beads seemed too delicate. “More IS more!” seemed like the way to go.


Once I folded down the stiff edges, a really neat brooch emerges! Honestly, it was time to stop and finish it up properly. Since I kept referring to it as a brooch, it needed some sort of device to secure it to clothing.


Brooch finish 

Basic brooch pins are tacky and and would ruin my art piece! Naomi’s method of securing a vintage pin requires a larger surface! My friend, Sue Henry, showed our Beading Circle of friends super magnets which function as brooch holders. If it works for her raku brooch, it should be fine for my glass tiles surrounded by beads! Sue gifted one such magnet to me for this project!

Now that I had a clear vision and magnet in hand, I needed to correct some of my creative stitching so that I could have a smooth triangle edge between the large matte beads. In two cases, I needed to add a large red bead sideways between the inner cross arms and outer orange tipped red bead. I found that a seed bead on either side of the matte pony bead finished the brooch corner edge smoothly. In this case, the black background was very forgiving!! I found the black ground drained the vibrancy of  translucent beads I wanted to use in the brooch.


Time to fold in the stiff felt corners and stitch them down. I peeled off the magnet backing and positioned it at the top of my diagonal cross.


Luckily, I had faux leather for finishing projects. I cut a square to the right size. It was necessary to clip the corners of the backing so the curved edges would come out well.

As I was stitching the backing to the front, I was trying to secure the triangle beads so the finish would be smooth. That meant creatively stitching between to catch and through to move forward to the next triangle. The magnet got covered, too!

Yes, but will it work (as a fastener for a brooch)?? The other half of the magnet instantly snapped on top of the inner one. This was good Step One!! We’ll have to test it on clothing!

The nice triangle edge is sleek, an innovative change from the usual seed bead finish!

Stretchy bracelet

Time for the bracelet! Since there were just eight tiles left, I needed to test the size of the beads in between the tiles so they fit my wrist. The mini pressed-glass chicklets are a little bigger that the large seed beads and worked perfectly.


Next, I needed to audition the tiles and place then into a pleasing order. There were three super splotchy works of art and several diagonally steaked ones. What had the best rhythm?

Which stretchy cord do I use? 1mm thick just goes through once. There would be no room for going through to secure cord ends once the bracelet is securely knotted. A finer .05 stretchy cord was better because I could run in the ends in once securely knotted. When I flip the tiles over, you can see the two channels for running the stretchy cord. The red chicklets needed to be auditioned for evenness and size. The object was parallel chicklets between art tiles!

Cut the stretchy cord twice as long as your wrist for easy threading and later reinforcement run. 

Once threaded, tie a double knot by stretching the two ends of the cord.

Repeat same stretched double knot on the other cord. Start weaving the cord back on each side through the back of tile. Tie an overhand knot around the cord and weave through another chicklet and tile.

Keep weaving the cord back on both sides with overhand knots in between. When one side cord was not enough for a full second rotation, I found that I could switch over my longer cord and reinforcement to the other one. The goal was to have two double cords running inside the glass tiles.

My finished pieces are called Electromagnetic Radiance for the vibrancy and acknowledgement a magnet is acting as a brooch.

This was revealed during a Zoom meeting of the Toronto Bead Society on Aug 11th.

This is one of my favourite meetings because it’s fun to see what members come up inspired by the moody colour palette!


Thursday, May 7, 2015

Beading Tips from an insider

Here are some of the key points from Maria's presentation at the Spring Creativ Festival 2015.

One of the question often asked about making necklaces, other then techniques, is about the correct length for various styles. This image shows the standard length you will need to adjust to ensure that it will fit the wearer perfectly.

Guidelines for necklace lengths
Essential tools for most beaders include a design board, needles, cutting tools, pliers, personal lighting and a work surface.

Your work surface can vary based on personal preferences, portable and cost. Here are some that Maria uses; bead on it boards have a contained surface and lap trays can allow you to bead as a passenger on road trips. But Maria's personal favourite is Chinet plates. They contain the beads, are inexpensive and portable (dessert-size will fit into a medium ziploc).

Bead on it Board in use

Lap tray is use

Multiple Chinet plates in use

Tools you will need for basic beadweaving are thread trimmers and various size needles.

Beading threads are generally nylon based. Picture below are the various threads including nymo, C-lon, One G, and Fireline.

various beading threads
Use the colour that best blends into your work. Neutrals such as black, white, grey and ash are essential to have available. Colour does matter. Below are two bracelets, one stitch with crystal Fireline and the other with black nymo.

Thread colour matters
Fireline and other products form the fishing world are used where a stronger material is needed.

Getting the needle onto the thread can be a challenge due to the very small eye of fine beading needles. Try needling the thread. Hold the thread between finger and thumb with just a small end showing. Move the needle onto the thread. If you still have trouble flip the needle as the eye of the needle is punch and one side is smoother than the other.

Needling the thread
At some point in a larger project you will have to add new thread. Here is a great video from Melanie Potter, of the School of Beadwork.


Create a slipknot 8-10 inches from the end of your new thread. Slip it onto the old thread. Tighten and slide down on the old thread to the work. Tie the ends with a surgeon's knot (a square knot with an extra twist).
Adding new thread

You will need to secure the ends into the work using circle knots.

Circle around the woven thread between beads, pull end thru the small loop created and pull tight. Repeat a few times for each end.

Circle knot
A helpful tip for finishing a bead woven necklace is to add an extra bead between the clasp and the beadwork.

Here are some different style of closures you can use to add the last finishing touch to your design. Choose a clasp that works with the style, scale and design of the piece.


Toggle work well for bracelets

Tubular clasp are available in different sizes for wider designs.

Ball & Socket closures are very secure
Working with beading wire requires a different set of tools. Crimping pliers, wire cutters, round nose and flat nose pliers. Choose that best tools that you can afford.

Another small but very helpful tool is a beadstopper. You will likely want to have a number of these little springs in your tools collection. Once attached to the beading wire the beadstopper keeps the beads from sliding of the wire. This is very useful when audtioning the beads for your design.

Auditioning pearls & crystals for a bridal necklace
Auditoning various clay and Tagua nut beads for two different styles
Once you have finalized your design for your stringing project you will need to you crimp beads to attach the findings. Here are the steps for crimping crimp beads.


For a more finished look you can use crimp covers over the crimps which hides the crimp within a hollow bead. Another great finishing component is a wire guard. It will protect the wire as it goes thru the finding.

Detail of crimp covers and wire guard
To create earrings or dangles you will need to use head pins and eye pins. Your basic wire tools listed above are all you will need. Here is the basic steps for creating loops on the pins.

Classic dangles added to a larger crystal to make different earring styles
Follow this link to a folder with the three handouts that Maria gave out during the presentation.

Watch for the highlights of Maria's other presentation "Simply Beadweaving" on the weekend.

Happy Beading!


Tuesday, August 5, 2014

International Road Trip

It has been a while seen either Maria or I have posted on the blog, but watch from upcoming posts as Maria is going on an international road trip.

As I am writting this she is doing last minute packing and getting ready to head to the airport. First she will be in western Ukraine for family visits, genealogy research, presentations about beadwork and teaching her Ndebele Motif Cuff. There is also the screening of the documentary, Three Muskateers which is related to documentary about her uncle Lubomyr Cardinal Husar.

On August 14, in Kolomyya at the National Museum of Hutsulschyna & Pokuttya she giving her presentation Embellishing Your world: Beading & Surface Designs - Examples from World Cultures and also teaching the Ndebele Motif Cuff.
Poster for museum event
Ndebele Motif Cuffs
After her tour around Ukraine she will be heading to Czech Republic to tour the glass bead industry in Prague. Her tour guide will Czech beadwork designer Adela Kodonova.

Once she returns to North America she will be part of the Meet the Teach event at beadfx on September 13. She will be teaching the Ndebele Motif Cuff there later in the fall.

Maria will be sending me pictures and updates from her trip. I will be sharing them here and on our Facebook page.

Happy Beading!
Jo-Ann

Tuesday, December 31, 2013

ABC's of Creativity - Z is Zing

We have finally reached the end of our creative journey thru the alphabet. We started with A is Art and are ending with Z is Zing.

Zing is defined as vitality, zest or a quality or characteristic that excites the interest or enthusiasm (from dictionary.com).

Creatively zing could be the finding of that one color that will make you finished project different and special.  Here is an original variation of Julia Pretl's vase, with a matte olive green leaf color. The new variation I switched many colors including the leaf color to a silver lined lawn green. The use of the contasting purple for the flowers gives the new vase another needed zing.
Original variation, beaded by J. Woolverton
Revised variation, beaded by J. Woolverton


During her recent visit to Ukraine Maria met up with a fellow beader, Iryna Berdal-Shewchuk, who uses ndebele stitch with zing.  Here are some of her necklaces made with ndebele stitched beaded beads.
Assorted beaded bead necklaces, beaded by I. Berdal-Shewchuk

She also has an amazing way to share her creations with the world. She created this wonderful video showing her necklaces artistically arranged on the interesting and unusual manhole covers in Lviv.


Inspired by Iryna's use the ndebele stitch, Maria started to play with this stitch with zing. She played with variations of a basic motif to create this beaded bracelet. Maria will be teaching this new project at beadFX on Tuesday January 28.
Variation in ndebele, beaded by M. Rypan

Finished bracelet, beaded by M. Rypan
I hope that this past year Maria and I have inspired you to try something new with the same zing that Maria did after her visit with Iryna.

Maria and I have enjoyed taking on this creative journey thru the alphabet this year. In January we will each share some of our favourite posts.

Wishing you a happy, healthy and creative New Year!