
The moment I saw it, I remembered vintage glass tiles tiles I bought at the Bead & Button Show fifteen years ago. Stone Mountain Colorado brought many intriguing beady treasures from around the world to the Milwaukee show! I treated myself to these mini works of art, which look like lampwork glass squeezed into tile molds. No two are the same! The obvious thing to do with these tiles was to string them on two stretchy cords! But no, the tiles just sat in a drawer until this challenge!

Lampwoork tile booch


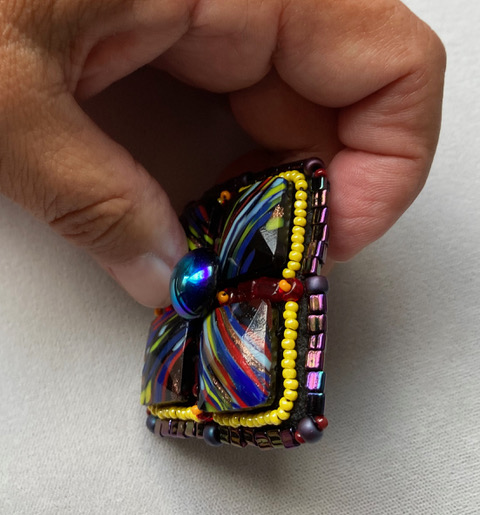
Added the same orange-topped red pony bead to the end of each row. Next, I stitched down a row of warm yellow charlottes around the tile ensemble.

Single matte purple iris pony beads were added to the corners and the ends of each arm of the cross. Since purple is the complimentary color of yellow, my brooch began to visually pop!! I added triangular Miyuki beads around the yellow seed border to add more texture to this heavy brooch. Seed beads seemed too delicate. “More IS more!” seemed like the way to go.


Basic brooch pins are tacky and and would ruin my art piece! Naomi’s method of securing a vintage pin requires a larger surface! My friend, Sue Henry, showed our Beading Circle of friends super magnets which function as brooch holders. If it works for her raku brooch, it should be fine for my glass tiles surrounded by beads! Sue gifted one such magnet to me for this project!

Now that I had a clear vision and magnet in hand, I needed to correct some of my creative stitching so that I could have a smooth triangle edge between the large matte beads. In two cases, I needed to add a large red bead sideways between the inner cross arms and outer orange tipped red bead. I found that a seed bead on either side of the matte pony bead finished the brooch corner edge smoothly. In this case, the black background was very forgiving!! I found the black ground drained the vibrancy of translucent beads I wanted to use in the brooch.


Luckily, I had faux leather for finishing projects. I cut a square to the right size. It was necessary to clip the corners of the backing so the curved edges would come out well.

As I was stitching the backing to the front, I was trying to secure the triangle beads so the finish would be smooth. That meant creatively stitching between to catch and through to move forward to the next triangle. The magnet got covered, too!

Yes, but will it work (as a fastener for a brooch)?? The other half of the magnet instantly snapped on top of the inner one. This was good Step One!! We’ll have to test it on clothing!

The nice triangle edge is sleek, an innovative change from the usual seed bead finish!
Stretchy bracelet
Time for the bracelet! Since there were just eight tiles left, I needed to test the size of the beads in between the tiles so they fit my wrist. The mini pressed-glass chicklets are a little bigger that the large seed beads and worked perfectly.


Which stretchy cord do I use? 1mm thick just goes through
once. There would be no room for going through to secure cord ends once the bracelet
is securely knotted. A finer .05 stretchy cord was better because I could run
in the ends in once securely knotted. When I flip the tiles over, you can see the
two channels for running the stretchy cord. The red chicklets needed to be
auditioned for evenness and size. The object was parallel chicklets between art
tiles!

Cut the stretchy cord twice as long as your wrist for easy threading and later reinforcement run.

Once threaded, tie a double knot by stretching the two ends of the cord.

Repeat same stretched double knot on the other cord. Start weaving the cord back on each side through the back of tile. Tie an overhand knot around the cord and weave through another chicklet and tile.

Keep weaving the cord back on both sides with overhand knots
in between. When one side cord was not enough for a full second rotation, I
found that I could switch over my longer cord and reinforcement to the other
one. The goal was to have two double cords running inside the glass tiles.

My finished pieces are called Electromagnetic Radiance for
the vibrancy and acknowledgement a magnet is acting as a brooch.
This was revealed during a Zoom meeting of the Toronto Bead Society on Aug 11th.
This is one of my favourite meetings because it’s fun to see what members come up inspired by the moody colour palette!


Thanks for all your detailed photos and steps!
ReplyDelete