Thank you to Natalka C. of Winnipeg for the opportunity to restring several small balamuty necklaces in a one-of-a-kind statement piece. Natalka hoped for an appropriate clasp to go along with her priceless balamuty and I had just the perfect ‘chepraha’ for the job.

I’ve been seeing more and more strings of balamuty for sale on social media and occasionally saw them adorning Ukrainian folk costumes. So, I welcomed the chance to work with these precious beads. But what are balamuty?
Balamuty defined
Roksolyana Shymchuk, the owner of Etno-Galleria and Museum in Lviv posted all about balamuty on her Facebookpage.
Balamuty are fossilized mother of pearl. (Ukrainian women were looking
for an equivalent in their language to the German
"mother of pearl - perla mutter" and chose the similar sounding
"balamuty"). Veins of fossilized mother of pearl occur in a dense
coquina, which is used as a building material in the Transdnistrian part of
Ukraine (Vinnytsia region), the left bank of the Dniester,
and in Moldova, on the right bank.
Coquina is a sedimentary rock that is composed either
wholly or almost entirely of the transported, abraded, and mechanically-sorted
fragments of the shells of mollusks, trilobites, brachiopods, or other
invertebrates. It was formed in the warm sea around the coral reefs and atolls
that lay in this region 25 million years ago.
Modern nacre/mother of pearl is much lighter. Balamuty are mineralized rock of sedimentary origin, and are heavier. For this reason, balamuty should be worn carefully, because the beads have the capability of splitting when struck.
Cheprahy defined
Mykola Hrabovetsky, wrote about cheprahy (singular-chepraha) in his illustrated Ukrainian article, “Hutsul zgards (zgardy) — unique spiritual symbols of the Carpathians”.
Cheprahy were clasps used to connect the zgards (brass handcrafted cross-formed amulets) into necklaces. Cheprahy were two, mostly round, plates decorated with embossed or openwork ornaments. At first glance, the disproportion between the sizes of the cheprahy and the zgardy is striking. Cheprahy, as a rule, have large sizes, completely unjustified by their utilitarian function. Some of them reach 6-7 cm. in diameter, which indicates their special place among neck ornaments.
Chepraha is a solar symbol designed to protect a
person from evil spirits. In the central part of the chepraha decor, various
variants of solar symbolism are placed: a wheel with eight, six or four spokes,
concentric circles, etc.

I happened to have a reproduction of a six-spoked chepraha on hand. In 2012 I purchased it from Vsevolod Bazhaluk, a jeweller who cast reproductions of vintage Hutsul zgardy in Ivano-Frankivsk. He first reproduced them as a fundraiser for ATO defenders fighting in the early Russian invasion of Eastern Ukraine. My chepraha has a single loop on the underside like clasps found on zgardy in museums.
Its large size seemed to be the right clasp for a multi-strand balamuty necklace. You’ll see from my photo story how I was able to make it work. Most of my photos show the underside of the clasp and my problem-solving.
The task at hand
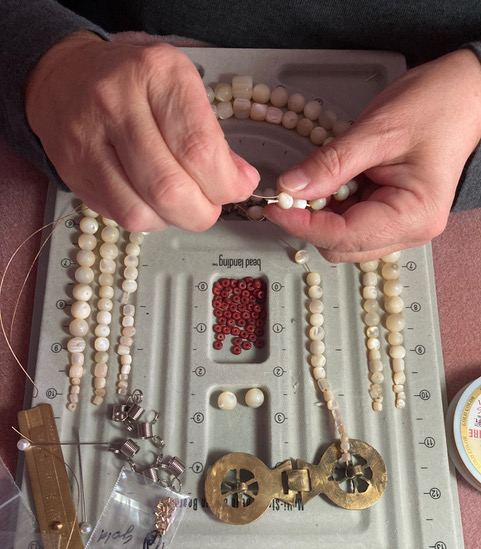
To create a multi-strand necklace meant cutting apart several short necklaces Natalka collected over a period of time.

A multi-strand Design Board was essential. Once cut, the balamuty beads needed to be graded with a gauge and by eye. I cut apart four necklaces and removed the reddish discs between the balamuty in one of them.
The design board allowed for easily switching beads from one side to the other for balance. Smaller rougher-shaped beads were divided into six groupings between the backs of three strands.
My necklace was designed to showcase the larger balamut bead in front
with a gentle decrease in bead size for a comfortable
fit around the back of the neck.

I used a gold color nylon coated 19-strand .018 Diameter beading wire for this project. When working with wire, it was essential to have spring clamps to stop beads from escaping. As a standard practice, it was best to cut the wire longer for easy looping around the clasp and weaving the tail in further inside.

Adding the Chepraha clasp
It was essential to use crimps with beading wire. I used gold metal crimp tubes which are soft and easily flatten to grip the wire once crimped tightly.
When adding the clasp, I used a longer wire and strung one crimp next to the clasp and placed another crimp tube further into the string of beads. Once I pulled the wire was through the clasp loop, I threaded it back through the first crimp and further into several beads. Then I pull the wire to tighten the wire around the clasp.
Using crimping pliers, I flattened the two tubes to grip the beading wire securely. (The pliers are designed to fold over the flattened crimp, but I do not have the skill for this step.) Once crimped, I proceeded to push the remaining wire tail inside the bead string for security. Finally, I clipped the excess wire closely between beads to prevent scratching.

Once one side was secure, I strung the beads laid out on the design board. To easily transfer beads from an old necklace onto the wire, I
created a bridge to slide them over, as shown.
FIRST string
Once I strung the FIRST balamuty string near the neck, I needed to repeat the clasp securing process in reverse. Inching my way towards the clasp, I had to add a crimp tube before the final bead, then add another crimp tube next to the clasp loop.

To secure the clasp, I went through the closure loop and back through the crimp tube, bead, crimp and down a few more beads.

I pulled the wire taut and proceeded to flatten the tubes with crimping pliers.


Now, the wear test! How does the first string sit, look? My husband
took this photo so I could illustrate the importance of fit-testing. I sent
this photo to my client to get approval. Natalka confirmed this
length was perfect!
FYI: If she would have wanted a longer balamuty necklace, I would
have had to cut apart the fifth necklace and distribute the beads into three
strings.
SECOND string
Securing the SECOND string to the clasp was done in exactly same way as the first.
I started with a longer wire, strung the beads and crimp tubes as
described earlier. The important thing was its placement of the underside loop.
I then threaded the wire back through the crimps and beads. It was vital to
make sure the FIRST string was on the side near the clasp closure hooks.

I pulled the wire to tightened it into position in the center of the clasp loop. Once taut, I flattened the crimps to secure the start of the SECOND string.

Next I proceeded to string the balamuty as I had laid them out. Securing the other side of clasp exactly as I had done the FIRST string. Only exception was to make sure the wire with crimps sit in the center position on the underside chepraha loop.

Here I am testing the chepraha closure and how the two stings of balamuty look when worn.
THIRD string
Securing the THIRD string to the clasp was done in exactly same way as the first two strings. The main thing was to position the loosened wire with beads and crimps in the outside position on the underside chepraha clasp, as shown.

Once positioned, I pulled tightly and crimped firmly to secure one side. Then I strung the balamuty as laid out on my design board.

I had to be careful in securing the other end to the outside position on the underside chepraha loop, as shown.

Next was the test to see how the balamuty laid and hung when worn. Here I am in front my favourite painting, “Gerdany-makers” by Christina Yarmol.
I see a larger gap between the first and other strings. Perhaps the single larger beads in the two lower strings are pulling down more than the even-sized round balamuty in the first string.

DROPPING DOWN FIRST STRING
In order to minimize the gap, I carefully opened the flattened crimps with pliers to release the wire from the clasp. I needed to cut a new longer wire so I can redo the FIRST string. For this I would need to add a few extra beads on each side.
I looked through my stash of beads for clear or pearl-colored pony
beads to add behind the clasp so that the balamuty can drop down below the
chepraha edge.
See the photo for the beads I used to extend the FIRST string. Compare
it with the original SECOND and THIRD strings.

I secured the extended FIRST string on the other side on the inside of the clasp near the closure.

FINAL TEST
I tried the balamuty necklace on again. My husband photographed the chepraha closure from the back. It really is attractive and fitting for a multi-strand balamuty necklace.

Here I am modelling the new improved balamuty necklace against my inherited Hutsul ceramic and incrusted wood collection. This is very fitting for a necklace with a chepraha from the Carpathians.


