Thanks to Anna Chaykovska of Vinnytsia, Ukraine for reminding us about the unsung heroes behind this immense project!
While going through her archives, she came across unique photos from the preparation for printing of the book White Aster of Love by Iryna Senyk. The deluxe 160-page edition is a collection of bilingual poems, Iryna’s fashion sketches with charted embroidery, and photos of elegant dresses inspired by the illustrations.
The back story
 |
| 3 Invinsible Spirit |

Iryna Senyk
Iryna
Senyk, poet, former political prisoner who spent 34 years in Soviet hard- labor
camps and exile, member of the Organization of Ukrainian Nationalists (OUN) and
the Ukrainian Helsinki Group (UHG), died on October 25, 2009 at the age of 83.
In the summer of 1989, they met in Lviv. Iryna gave Christine a folder of poems and her original fashion sketches decorated with embroidered designs. Christine took this gift with her to Canada at great risk. While leaving Ukraine for Przemysl, they were detained for a long time at the border and, as usual, everyone was ordered to get out of the car. Christine stood aside and prayed that these officers would not find a folder with Iryna Senyk's works while checking the car. Luckily, they did not see the folder, so with great relief Iryna’s works were brought to Canada.
The story of this book is extremely interesting, and the creative preparation for its presentation are even more interesting. It was published by the women's organization - UCWLC in Canada to honour pioneer women on the occasion of the centennial of the settlement of Ukrainians in Canada (1891-1991).
Project of the St. Demetrius Ukrainian Catholic Women League of Canda (UCWLC)
Christine approached her UCWC branch at St. Demetrius the Great Martyr Church with an idea. She proposed the League publish a book of Iryna Senyk's works. Branch president, Elsie Stieglan, and members agreed to this proposal and created a committee headed by Christine Bolubash. Pastor and Spiritual Director, Rt. Rev. John Tataryn, approved and blessed this project. Fr. Terry Lozynsky helped with practical matters.
 |
| Book Committee 1992 |
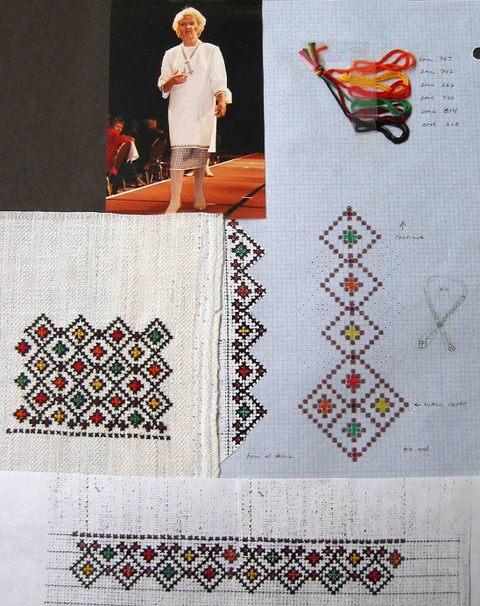
The committee decided to publish a book of fashion sketches,
charted embroidery miniatures, and poems by Iryna Senyk.
The 100th anniversary of the settlement of Ukrainians in Canada (1891-1991) was
approaching. The ladies wanted the poems to be translated into English and
published in a bilingual collection. In this way, previous generations and
foreigners could get acquainted with the extraordinary talent of the long-time
political prisoner of 34 years.
Bringing Iryna's fashion sketches to life
In the search for a designer who could bring Iryna's sketches, decorated with patterns, into contemporary dresses to life, the UCWLC put a notice in the church bulletin. Parishioner, designer and graphic artist, Maria Rypan volunteered.

See the Portfolio of My Iryna Senyk dresses (1989-1992) blog post about this portion of the project.
Everyone had to finish their embroidered elegant outfits by the spring of 1992 so that Oleh Iwanusiw could photograph the ladies, the “models,” at the Etobicoke Conservatory for the upcoming book.
 |
| Olga S., Olga W, and Anne |
Preparing the “White Aster of Love” book
 |
| "White Aster of Love" book cover |
Before preparing the
book, Ariadna Stebelska wrote a scholarly analysis, and Morris Diakowsky worked
on the introduction. Eugene Rypan took up the computer-graphics conversion of
Iryna’s ornaments. Maria Rypan did the artistic design of the book. She was
well organized, so the books printed overseas were delivered in time for the
grand
Première. The Committee and president Olga Krawec, decided to
hold the presentation in the Grand
Ballroom of the Marriott Hotel. This was going to be a serious fashion show on
a runway, not a church hall production.
Christine Borsuk volunteered to translate Iryna’s lyrical poetry. When the Committee realized there were not enough poems to complete the publication, they asked Iryna to provide additional material. These were transported to Toronto by Christine’s Bolubash’s sister Bozhena Iwanusiw.
 |
| Bozhena Iwanusiw & Christine Bolubash |
The author called this publication “White Aster of Love.” Christine Borsuk sensitively conveyed the meaning and reflection of feelings and events in her translations of 67 of Iryna's poems.
 |
| Spring, O Spring |
In the publication, each poem was decorated with an ornament in the style of a cross-stitched embroidery. This is because Iryna decorated everything with embroidery. Whether it was miniature gifts for her cell mate friends, stitched on fabric scraps with pulled threads, or stylized embroideries with coloured pencils on paper to accompany a poem or letter.
 |
| Toronto Star Article, Oct 16, 1992 |
Premiere of “White Aster of Love”
The committee invited Iryna Senyk to the world premiere of White Aster of Love and were very overjoyed when she agreed to come. They decided to hold a grand presentation of the publication at the Marriott Hotel in Toronto on September 27, 1992.
Maria Rypan also produced Première. Daria Diakowsky, an extremely talented organizer of public events and presentations, a teacher at St. Demetrius School, was invited to direct the program for the presentation of the book White Aster of Love. As a director, Daria came up with the theme “Seasons of the Year,” based on the poems of Iryna Senyk.
Lillian Yuryk and Margareta Shpir prepared the scripts. Slides of Iryna's sketches were interwoven with paintings illustrating feasts and seasons. The multi-media program included a fashion show of women's and children's clothing embroidered with Iryna's designs, and stories about her difficult, full of patience and struggle for a better life and the poetic creativity of the Ukrainian heroine in two languages.
 |
| Collage of photos from Premiere |
The ladies, trained by Uliana Ihnatovych and Mariyanna Zaparaniuk, modelled embroidered outfits according to the script. Actress Joan Karasevich and Luba Zaraska introduced each Season theme; young girls Yulia Krekhovetsky and Lara Semeniuk recited poems. The musical accompaniment was provided by Roman Demeda and Orest Skliarenko. Two poems were set to music. The choir of the Church of St. Demetrius the Great Martyr sang “White Aster of Love”, music by Myron Maksymiv. “Oh, You, Madonna of Madonnas”, music by Zenon Lavryshyn, was sung by soprano Luba Kozak and tenor Oleh Chmil. The last runway models, Maria Rypan and Dzvinka Haba, presented Iryna field white asters.
 |
| Iryna Senyk & Christine Bolubash |
Christine Bolubash presented the deluxe White Aster of Love book to its author, the indomitable Ukrainian patriot Iryna Senyk. These were published works from the folder she gave to Christine in 1989 in a park in Lviv. This was the most touching moment for Iryna and for us, the members of the Committee. Iryna spoke to her loyal admirers and her dedication. Everyone was happy to personally meet the Ukrainian poet, artist, and indomitable patriot of Ukraine.
The
members of the St. Demetrius UCWLC worked selflessly and generously helped
organize fundraising events. Without their help, this project would not have
been possible.
 |
| "White Aster of Love" in the Vinnytsia Regional Universal Scientific Library |
A shipment of 1000 books was organized to Ukraine, where Iryna Senyk and volunteers distributed White Aster of Love to schools, universities, and libraries. Anna Chaykovska confirms White Aster of Love was received by the Vinnytsia Regional Universal Scientific Library named after K.A. Timiryazev, for which the people of Vinnytsia are grateful to everyone involved in the project.
 |
| Iryna Senyk and models |
Iryna came again for the Celebration of 100 Heroines of the World
 |
| Iryna Senyk at 100 Heroines of the World |
In 1998, the Society of American Ladies in Rochester selected Iryna Senyk as “One of the 100 Heroines of the World.” The ceremony was held in Rochester, USA. The St. Demetrius UCWLC again sponsored Iryna Senyk’s trip from Ukraine to Canada and USA for this celebration. A group of women in their embroidered dresses, the patterns of which were the designed by Iryna Senyk, traveled with Iryna in honour.

There still are a few books available.