pinterest pin it

Saturday, August 7, 2021

Electromagnetic Radiance - Summer 2021

This summer’s Toronto Bead Society (TBS) challenge was not your usual pastel palette! Marilyn Parker presented us with a spectacular sunset photo with deep moody color extracted along the lower edge.

The moment I saw it, I remembered vintage glass tiles tiles I bought at the Bead & Button Show fifteen years ago. Stone Mountain Colorado brought many intriguing beady treasures from around the world to the Milwaukee show! I treated myself to these mini works of art, which look like lampwork glass squeezed into tile molds. No two are the same! The obvious thing to do with these tiles was to string them on two stretchy cords! But no, the tiles just sat in a drawer until this challenge!


Lampwoork tile booch 

I pulled out my tiles and laid them on the inspiration photo. Blue and red create purple when mixed and in my mind's eye. The yellow was like the sun! And further mixed by eye, a sunset! This is it!! I’m going to make the tiles work and finally have something I can wear!


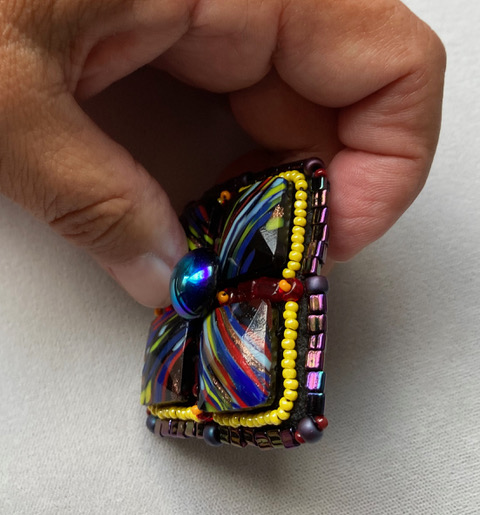
How many tiles do I need for a bracelet? What’s left? What can I do with four tiles? Bead embroider a brooch was the only answer. Glad I had a black stiff-stuff base to stitch down the tiles. Because they were facetted and thick, I arranged them diagonally into a cross. Then, stitched down a Czech glass button as a centre focal. For zing I secured a large red pony bead with an orangey charlotte bead at the base of the turquoise glass button. Next, I stitched down two red mini chicklets between my tile cross.

Added the same orange-topped red pony bead to the end of each row. Next, I stitched down a row of warm yellow charlottes around the tile ensemble.

Single matte purple iris pony beads were added to the corners and the ends of each arm of the cross. Since purple is the complimentary color of yellow, my brooch began to visually pop!! I added triangular Miyuki beads around the yellow seed border to add more texture to this heavy brooch. Seed beads seemed too delicate. More IS more!” seemed like the way to go.


Once I folded down the stiff edges, a really neat brooch emerges! Honestly, it was time to stop and finish it up properly. Since I kept referring to it as a brooch, it needed some sort of device to secure it to clothing.


Brooch finish 

Basic brooch pins are tacky and and would ruin my art piece! Naomi’s method of securing a vintage pin requires a larger surface! My friend, Sue Henry, showed our Beading Circle of friends super magnets which function as brooch holders. If it works for her raku brooch, it should be fine for my glass tiles surrounded by beads! Sue gifted one such magnet to me for this project!

Now that I had a clear vision and magnet in hand, I needed to correct some of my creative stitching so that I could have a smooth triangle edge between the large matte beads. In two cases, I needed to add a large red bead sideways between the inner cross arms and outer orange tipped red bead. I found that a seed bead on either side of the matte pony bead finished the brooch corner edge smoothly. In this case, the black background was very forgiving!! I found the black ground drained the vibrancy of  translucent beads I wanted to use in the brooch.


Time to fold in the stiff felt corners and stitch them down. I peeled off the magnet backing and positioned it at the top of my diagonal cross.


Luckily, I had faux leather for finishing projects. I cut a square to the right size. It was necessary to clip the corners of the backing so the curved edges would come out well.

As I was stitching the backing to the front, I was trying to secure the triangle beads so the finish would be smooth. That meant creatively stitching between to catch and through to move forward to the next triangle. The magnet got covered, too!

Yes, but will it work (as a fastener for a brooch)?? The other half of the magnet instantly snapped on top of the inner one. This was good Step One!! We’ll have to test it on clothing!

The nice triangle edge is sleek, an innovative change from the usual seed bead finish!

Stretchy bracelet

Time for the bracelet! Since there were just eight tiles left, I needed to test the size of the beads in between the tiles so they fit my wrist. The mini pressed-glass chicklets are a little bigger that the large seed beads and worked perfectly.


Next, I needed to audition the tiles and place then into a pleasing order. There were three super splotchy works of art and several diagonally steaked ones. What had the best rhythm?

Which stretchy cord do I use? 1mm thick just goes through once. There would be no room for going through to secure cord ends once the bracelet is securely knotted. A finer .05 stretchy cord was better because I could run in the ends in once securely knotted. When I flip the tiles over, you can see the two channels for running the stretchy cord. The red chicklets needed to be auditioned for evenness and size. The object was parallel chicklets between art tiles!

Cut the stretchy cord twice as long as your wrist for easy threading and later reinforcement run. 

Once threaded, tie a double knot by stretching the two ends of the cord.

Repeat same stretched double knot on the other cord. Start weaving the cord back on each side through the back of tile. Tie an overhand knot around the cord and weave through another chicklet and tile.

Keep weaving the cord back on both sides with overhand knots in between. When one side cord was not enough for a full second rotation, I found that I could switch over my longer cord and reinforcement to the other one. The goal was to have two double cords running inside the glass tiles.

My finished pieces are called Electromagnetic Radiance for the vibrancy and acknowledgement a magnet is acting as a brooch.

This was revealed during a Zoom meeting of the Toronto Bead Society on Aug 11th.

This is one of my favourite meetings because it’s fun to see what members come up inspired by the moody colour palette!


Friday, May 7, 2021

Still Life Dichroic Brooch

Thanks to my Tuesday afternoon Beading Circle for challenging me to create something fresh. Our Zoom meetings are a great opportunity for beady friends to compare notes, share bead trivia, discuss beading technique, spotlight new designers and patterns. Everyone is beading at home with their stashes nearby. Its fun to do bead along projects.

When the idea of doing a beaded brooch in April arose, folks assumed this would be a bead embroidery challenge. Someone suggested to peruse one’s stash for a button or cabochon as the starting point for a brooch focal. I did not have any buttons.

I’d like to share my creative process of my Still Life Dichroic Brooch.

DICHROIC FRAME ART

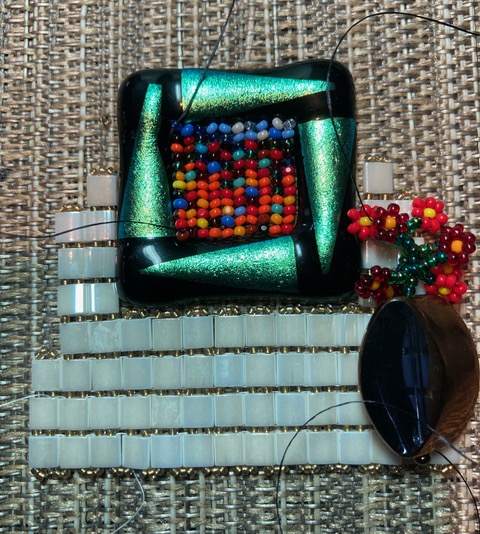
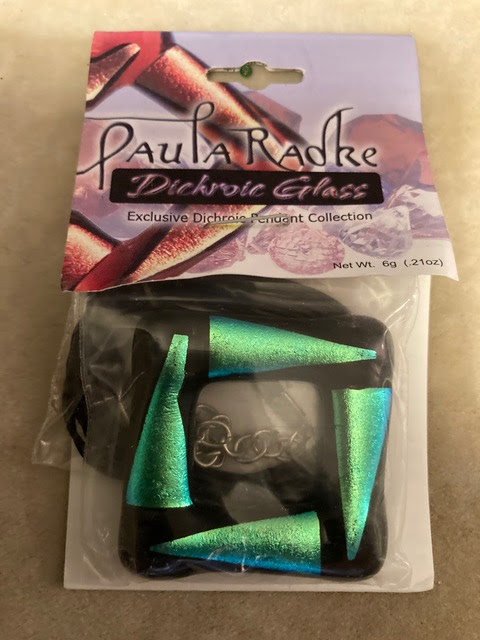
I did have a dichroic lampwork square frame pendant kit by Paula Radke from way back when I was participating in international bead shows in the late 2000s - early 2010s. I never strung the frame to wear, so it was perfect for my brooch!!


I envisioned the dichroic square as a frame for a miniature artwork. Google is full of images of paintings for inspiration! Rainbow Ridge - Colorful Landscape by Julie Brugh Riffey spoke to me. 


I poured a little of every intensely-colored charlotte 11o beads onto a Chinet® plate for painting with beads with the Ndebele technique.


I managed to recreate the feel of Rainbow Ridge one bead at the time. My beaded interpretation is dancing in the frame because of the shadows created by beads sitting at herringbone angles and the charlotte-cut of the beads which reflects light.


STILL LIFE 

Next, I used the leftover unique black-copper bead from the TBS 2021 Bag of Bead Challenge for a vase. Using the daisy stitch I filled the vase with beaded red and scarlet flowers.


To make sense, I decided to create a still life composition with my two main elements. Again, I looked through artwork on the internet for ideas. How do I show surfaces, light and shadows using beads? The artwork needs to be hung on the wall. The vase of flowers needs to be placed on a table.


TILA WALL

While scrounging around my stash I found a few surprises. I forgot I bought four tubes of Miyuki Tila Bead. Also, I purchased an assortment of microscopic seed beads from Bead Cats  in sizes 16o to 24o. I knew I had bugle beads in different sizes for creating the tabletop. 

The flat tile-shaped 2-hole Tila beads were ideal for creating a wall. I played around with square-stitching one tile to another and stringing a wonderful bronze-lined 15o seed bead between stacks of tiles. 


The wall grew tall and wide around the frame. The stepped down tile wall reminds me of Art Deco.


I had to work out how to assemble my beadwoven art in the frame, how to stitch my wall down. To create the brooch I needed some foundation to stitch and secure it to. I ordered a stiff felt beading foundation and a faux leather for a backing for my brooch from i-Bead

NETTED FLORAL TRIM 

I wanted my still life tablecloth to have a floral design. This is where the microscopic seed beads can in handy. The top of the netted tablecloth has microfine vintage bugles meeting up at the bronze-lined seed bead.

I found these would be a safe bet to connect the netted trim to the foundation. I sketched out a netted design in colored pencils. Clever color placement made it look like flowers with leaves. 

Each row of this vertical net is finished in a picot trim. The floral pattern was made to the width of the Tila wall.


Now was the time to stitch down the wall to the foundation. I cut out a rectangle of stiff felt, placed the netted tablecloth and calculated how high should the wall be placed.

How much space to I need for my bugle tabletop between the two?

BUGLE TABLE

I marked where to stitch the seed bead for the top of my netted tablecloth. This way everything was perfectly spaced. 

The wall was stitched down along the seed beads between Tilas. I then laid out the different colors of bugles trying to capture the light and depth of a table top.

TIP: To keep the color sequence intact for reference, take clear tape and press down on the bugle layout. The sticky tape will pick up the bugle rows as a single unit. Place it up higher for reference to see which bugle to pick and stitch them permanently in place. 

HANGING THE PICTURE FRAME

Then, it was time to hang up the picture. Luckily, there was a space on the wall for the frame. First, I traced the inside of the frame to know the positioning of the herringbone-stitched picture. I stitched my artwork to the foundations by stitching randomly between the beads.


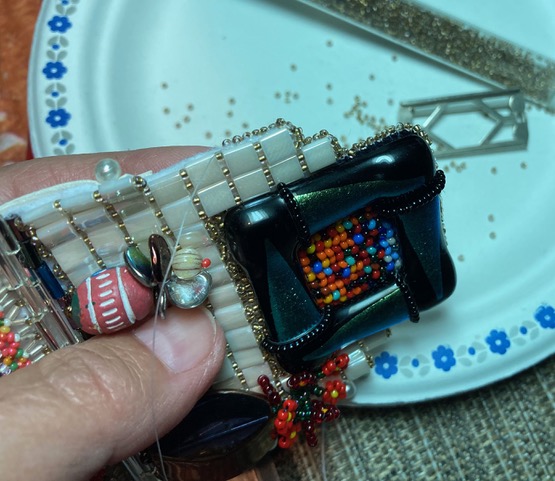
To secure the frame to the foundation, I used a single continuous line of Aileen’s glue. Then I pressed down the dichroic frame in position on top the glue. 

Once the glue dried, I stitched down the corners of the frame carefully not to break up the dichroic triangles design. I used single strings of fine black beads to stitch down each corner.  Then I reinforced them with extra stitches close to the bead strings. This way the glass frame is securely part of the foundation, an important consideration since I will need to add a brooch pin to wear!


Time to add the vase on the tabletop. The tail below the stop bead at the bottom of the copper vase was handy for securing through the tabletop bugle row. I then had to go up through the vase to secure the odd-shaped copper bead. The remaining thread from the daisy flowers was used to stitch down the flowers in a few places. 


To balance the composition, I created another vase using an incised Indian bead as the vase. Petal beads in my stash came in handy to create an exotic bloom. By stringing a 15o between each petal I was able to create a flower. It is topped with a melon bead with a coral turnaround bead for zing. This vase was positioned on the tabletop and stitched down to the background.

BROOCH PIN

Thanks to Naomi Smith of Black Tulip for sharing her technique of attaching vintage pins to brooches. I borrowed the pin from my Bead Poppy I beaded in her workshop. 


TIP: For a discreet brooch clasp, I centered and stitched across the 1” strip 1/4” down from the top of the faux leather backing. This was to prevent the vintage brooch pin from riding up too high.

BACKING

The brooch needed a backing for a tidy finish. I used faux leather which was really nice to work with. I cut it out in the same shape as the foundation. Also, I cut out a 1” wide x 3-1/4” brooch pin holder strip.

Time to start stitching the backing onto the foundation. For every stitch I added the 15o seed bead. This created a fine smooth discreet bead edge. The 1” strip was stitched together the backing. When I started stitching up near the black frame, I quickly recalled a tip to darken the edge.


TIP: Use a Permanent Sharpie marker to tone down the white foundation edge.


The bead edge-stitching continued down to the bottom and along the lower edge underneath the netted floral. The lower edge of the brooch pin strip was trimmed even to the lower edge and stitched together with the backing. The bead edge continued up to meet the start.

I slipped in the brooch pin under the strip ready to wear. I’m pleased my brooch is balanced and comfortable to wear.