 |
| 'Krvyulka' in the round |
I was thrilled when Orysia Sopinka asked me if I could restore her mother’s ‘kryvulka’, a precious keepsake and a piece of her cultural identity.
It was a privilege to get up close, to study the thread paths of an incredible traditional ‘kryvulka’ beadwoven by young Eva Vakyriak (1920-2014). This was the ultimate adornment for the Lemkos, a ethnographic Ukrainian group and Eva made her own for festive occasions.
 |
| Netted section ruffles when 'krvyulka' is straightened |
Eva would have beaded this as a teenager in her village of Chystohorb (Czystogarb), near Komancha (Komancza) in today’s Poland. In 1939 she left home forever to be an Osterbeiter, a foreign slave worker in Germany.
Orysia brought this to me in January 2020. Right away I said this ‘kryvulka’ has a lot of stories it could tell. So, here is what I gleaned from my restoration experience.
A ‘kryvulka’, the local term in Komancha, is a ‘kryza’, a broad collar comprising of four distinct sections:
A - ‘polotnya’ - top choker-like band usually, a right angle weave, using two needles or one today in the R.A.W. stitch.
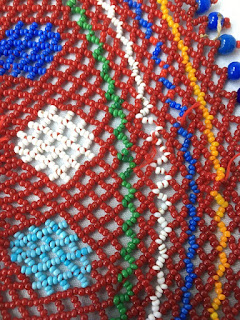
B - vertical netting with rhomb motifs. This then attaches to the ‘polotnya’ choker.
C - horizontal ‘zigzags’, rows of 5 beads going through the center of the previous row bead net to expand the width of the broad collar one colored row at a time.
D - ‘gombychky’, large accent beads used to trim along the lower collar edge.
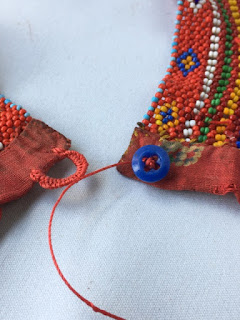
Eva ran out of large blue ‘gombychky’ beads and finished the trim with blue seed bead picots. She added a printed fabric to encase both ends so she could add a button and snap closure so her ‘kryvulka’ wears comfortably as a collar. Without this, the wide beaded net ends would fold over forward while wearing.
 |
| Fabric encased ends |
The best way of learning how something is constructed or beadwoven is to have to repair it! While it may seem sad, this is the best way to learn!
The entire ‘kryvulka’ was beaded with a red thick thread. Because of the tight tension, one wouldn’t notice missing beads or tears in places. Previous repairs would be with whatever beads colors were available. It was a challenge to repair in places because of the thickness of the thread/small size of the bead hole. Many fine needles broke in the process. I finally understood why there were knots and thread tails in places. It was a way to secure new thread, fill in beads and try to discreetly reinforce the addition.
I started repairing the netted motifs. One had to carefully add two beads above and below the mesh points in the vertical netting. Once the green rhomb net was repaired, I repaired a few more tears around.
 |
| Lemko ‘kryvulka’ and ‘leybychok’ (vest) beaded by young Eva Vakyriak. |


Great work preserving part of the Lemko culture. Thank you for documenting the prosses you used for repairing this treasure. Keep up the great work
ReplyDeleteVasyl Jula
Thank you for preserving my Baba's items!
ReplyDelete